Rub chicken skin with oil inside and out. Sprinkle with salt, pepper, and spices. Add butter under chicken skin. Place chicken on a can. Place can as far as possible from coals. Turn chicken every 15 minutes. Spritz skin, with water, to keep moist. Place a pan on top of coals and pour in some beer or water for added moisture.
Cook at 350 deg for 1 1/2 hour until 170 deg.
1 chimney = 300 deg for drum barrel Chargriller, about 1 1/2 chimney.
In the modern information age, there are numerous laws which affect the collection and storage of digital data. These laws often reference security standards that define specific methods of collection, the manner of storage, and other requirements that companies must follow. These regulations and laws are typically industry specific.
The primary purpose of these laws is to create a base line of rules for companies that collect data on consumers. They outline security protocols that must be followed to keep data safe. For example, a customer’s username and password must be encrypted.
These rules are collectively known as security frameworks, security standards, regulatory & compliance requirements, among other names.
There are three methods to upload and download data to Amazon Web Services. You can use the command line (CLI), AWS SDK, or the S3 REST API. In this article, we will explore the command Line interface, and the most common commands to manage an S3 bucket.
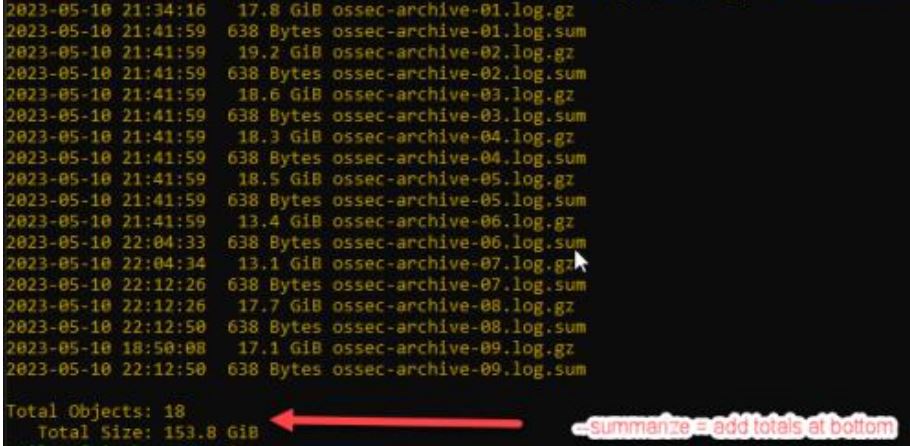
The maximum size of a file that you can upload by using the Amazon S3 console is 160 GB. The maximum bucket size is 5TB. You can not use s3api on files uploads larger than 5GB. Command line tools can achieve upload speeds greater than 7 MB’s. But, you can go even faster if you turn on acceleration. It is not recommended because an additional cost will be incurred.
Common switches
–dryrun = test what files would be uploaded, prior to running command.
— summarize = include a total at the bottom of the output.
— human-readable = show files sizes in Gb and not Bytes.
–output text = format the output on separate lines
–content-type=text/plain = Tell aws the upload data is text data (not video or other).
–recursive = show full file path
–exclude – leave out certain files.
–include = include certain files.
–delete = this flag is needed to remove any files.
–meta-data = Use this flag to upload custom data like the true MD5 hash
List contents of a bucket
aws s3 ls s3://bucket1/directory1/directory2/ --summarize --human-readable
Copy a single file
If the file is large, the cp command will automatically handle a multi-part upload dynamically. If the full path is not present, it will create it automatically in the s3 bucket.
By default, a task will only run when a user is logged in. If you want to run a task after hours or over night, you will need to select “run whether the user is logged in or not” and “run with highest privilege’s”, so it runs in admin mode. Finally, you will need to add the user to the local admin group.
Some blog posts will say, you still can get a task to run if a regular user is not logged in. You can add the user to the local security group policy under “logon as a batch job” by going to secpol.msc, security settings, user rights assignment, logon as batch job, and add the user. I tested this multiple times and could not get this method to work when attempting to run a PowerShell script. Perhaps, this only works for true batch scripts.
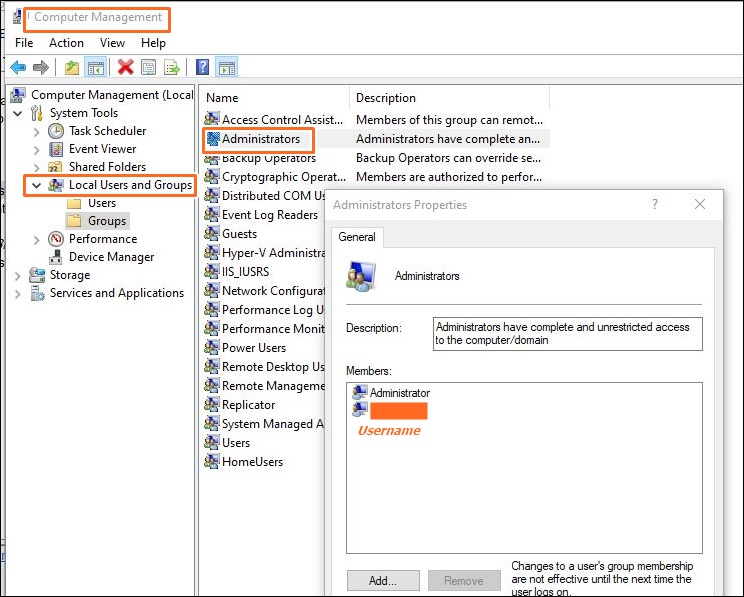
Let’s assume, I want to run a PowerShell script every hour of every day (i.e. 24 x7). First, check if your user is a local administrator. Go to Computer management, system tools, local users and groups, administrators. Verify he is included.
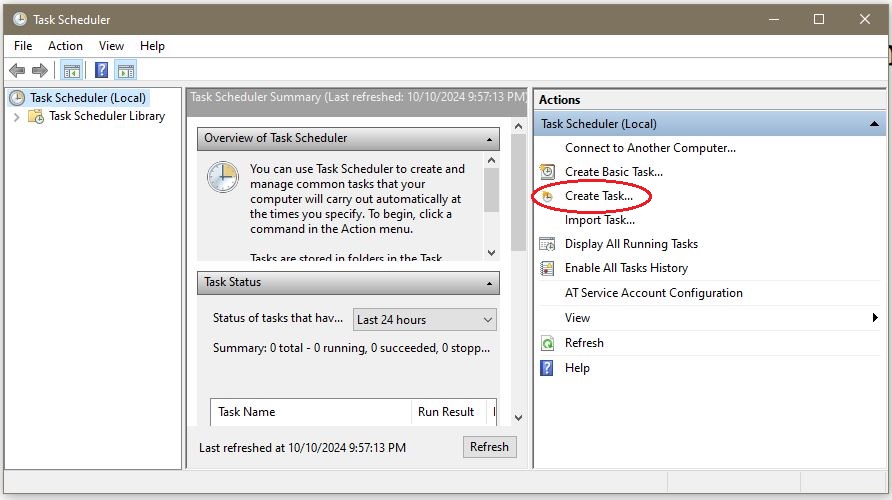
Run the task scheduler and select create a task.
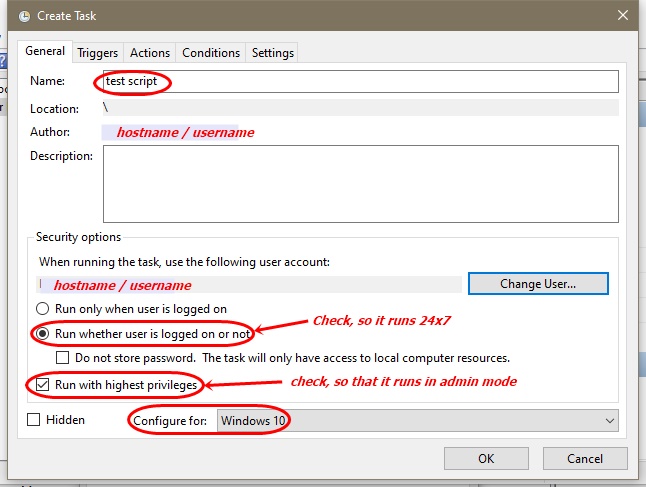
General Tab
Configure the Name, User account, Run whether the users is logged on or not, and Run with highest privileges, as it needs to run in admin mode when the user is logged out. Next, select Configure for Windows 10.
Triggers Tab
Select to run starting at 1:00 PM, every hour, and verify the task is enabled.
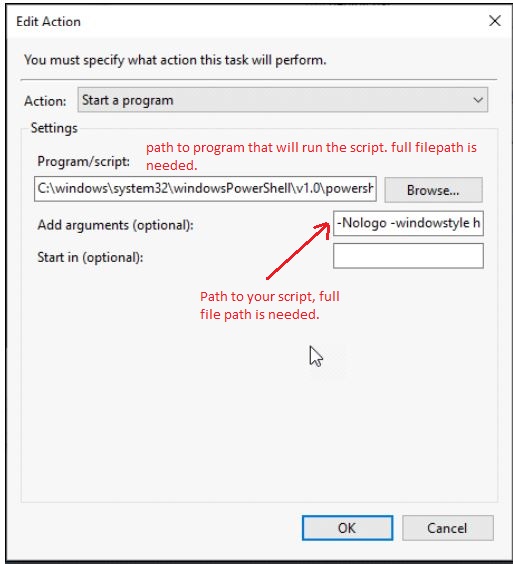
Action Tab
The script must be stored under the local user’s profile to get it to execute!!i.e. C:\users\username\tasks\yourscript.ps1.
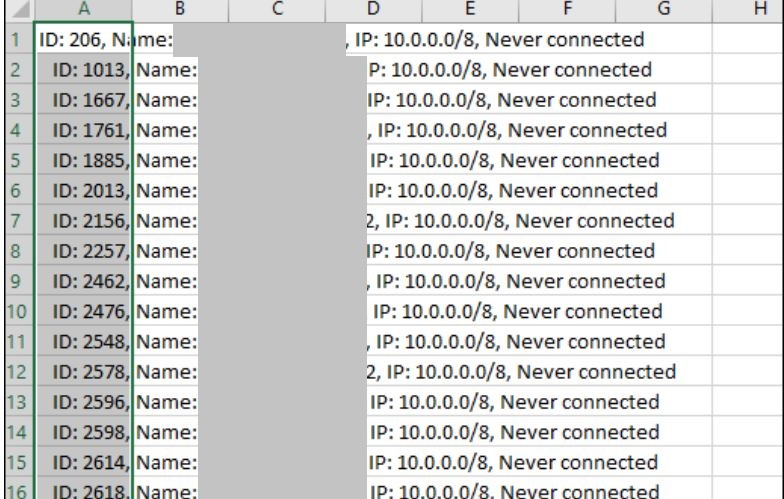
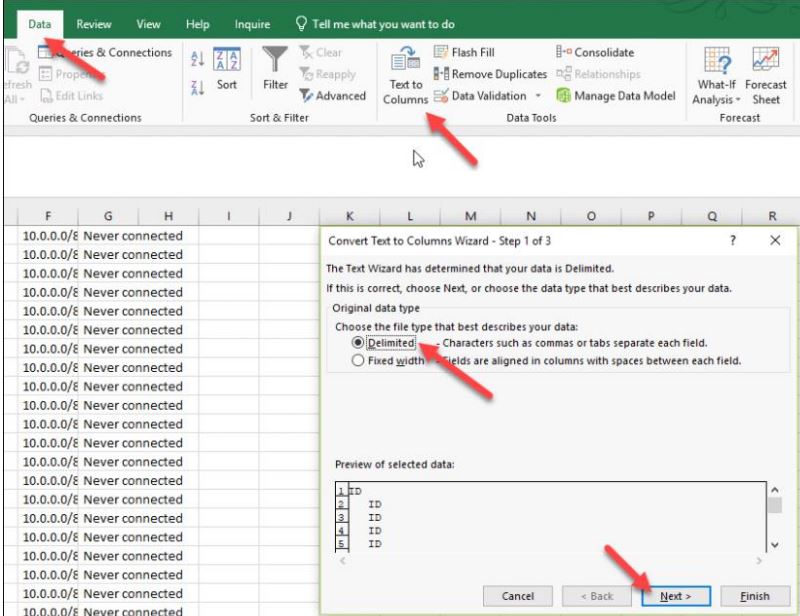
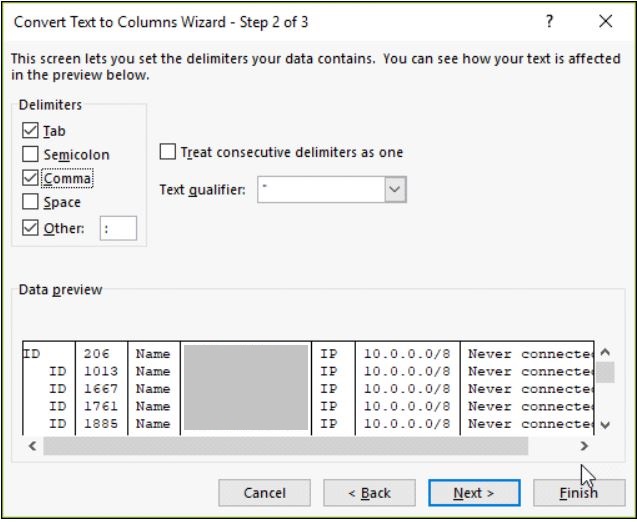
A common task to perform is when you have data in a text file and you need to copy and paste the data into excel and then split the date into columns. Unfortunately, when you do this it will put all the date in a single column. You have to then split out the date into columns using the below method.
Process
Highlight and copy date from notepad.
Paste data into excel. All data will be pasted into the first column only!
Select data, text to column, delimited, and then next.
Select the items you want to use as separators, usually tabs and spaces. Then hit next or finish.
Time is a critical component of every computer. When to run updates, launch scheduled tasks, or just to keep user’s informed, are all dependent on time.
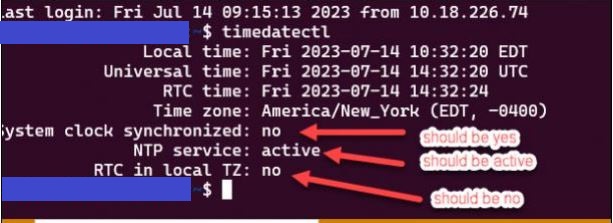
Every computer has a built in clock on the motherboard, usually powered by a battery, to keep track of the time. This hardware based clock is called the Real Time Clock (RTC) and is used to power the human readable ‘system time’, based on time zones.
System Time = Uses Time Zones
RTC = Real Time Zone = Uses Hardware clock
Unfortunately, the hardware clock will always eventually get out of sync with real time and need to be adjusted. This occurs because of power outages, battery on the MB dies, or other reasons.
Ubuntu Settings
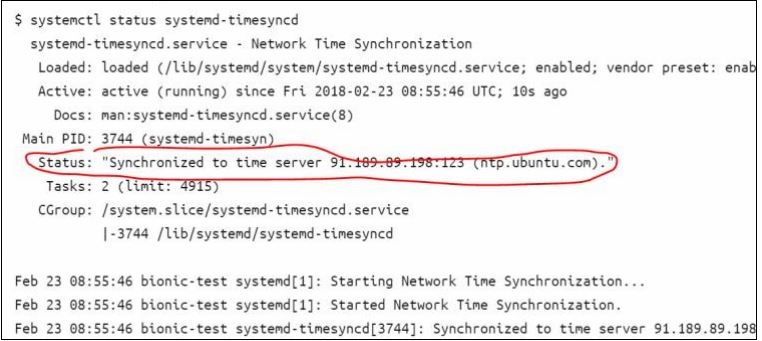
Two commands are used to control the date and time. First, the ‘timedatectl‘ command is used to set the time zone. Next, the ‘timesyncd‘ command is used start or stop the sync service and to turn on or off the network time protocol (NTP).
An older process to manage these functions is called ntpd. While this process is still supported, it is recommended to use the newer methods.
Check Your Time Zone
In the United States, there are three primary time zones.
UTC (Universal Time Coordinated)
EDT (Eastern Daylight Time) = 2nd Sunday March to 1st Sunday in Nov. = 4 hr behind UTC
EST (Eastern Standard Time) = 1st Sunday Nov to 2nd Sunday March. = 5 hr behind UTC
date
Get a list of available time zones
timedatectl list-timezones
Change the Time Zone
sudo timedatectl set-timezone America/New_York
Check the Sync & NTP Services
Note: Typically, the Real Time Clock or ‘RTC in local TZ’ should always be set to ‘no’. This is due to that most of the US uses spring/fall time changes and the RTC does not know anything about that.
Turn on the ‘System clock synchronized’
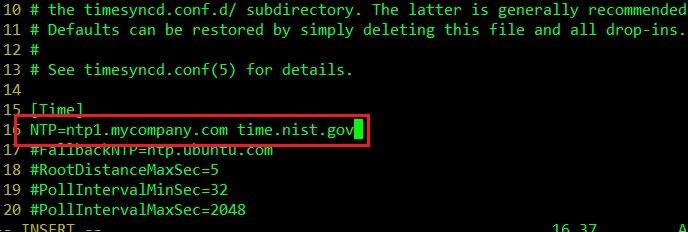
Check that there is a name server or two listed in the configuration file. The entries should be space separated.
sudo vim /etc/systemd/timesyncd.conf
Add the following lines under [Time]: NTP=ntp.myserver.com time.nist.gov