Introduction
Most folks are familiar with logging into a device or a a web page using a username and password. But a more secure method is to use a public private key exchange.
Ubuntu comes preinstalled with all the tools necessary to create public private keys. The private key is kept hidden and secure. The public key will be give out freely. It is recommend that you rotate your key pair frequently as a safety precaution.
In this article, we will look you how to generate a key pair, save your private key to a secure location, copy your public key to a remote host, troubleshoot, and introduce an auto login auto method.
Create a key pair
Login to the Linux computer that will be the device that you will connect from. This computer is the main control computer and where you will save your private key.
Open a command line prompt and run …
ssh-keygen -t rsaAfter the keys are generated, they will be stored under:
- /home/username/.ssh/id_rsa (private key).
- /home/username/.ssh/id_rsa.pub (public key).
Store the fingerprints of the remote PC
To get started using the key exchange method for connecting via SSH, you must have an existing user account on the remote server that you want to connect too.
But, before we can use the keys, we need to first store the remote server’s finger prints. We do this by sshing to the remote server three times.
- Server’s host-name (i.e. server1).
- Server’s FQDN (server1.mycomapny.com).
- Server’s IP address (192.168.10.100).
ssh username@hostname, FQDN, and IP addressEach time you ssh, you will be cautioned that the server is unknown and do you want to store the fingerprint. Select yes.

The remote server’s fingerprints will then be stored in a file under the specific user at /home/username/.ssh/known_hosts.
Push the public key to the remote host
Next, we need to push our public key to the remote server.
ssh-copy-id ~/.ssh/id_rsa.pub username@hostnameThis will create the ~/.ssh/authorized_keys directory on the remote server. If it does not exist, it will create it and place the public key inside it.
Connect to remote device using key exchange
Once you have created your keys, stored the remote server finger print, pushed your public key to it, you are now ready to login using the key exchange method instead of a username and password.
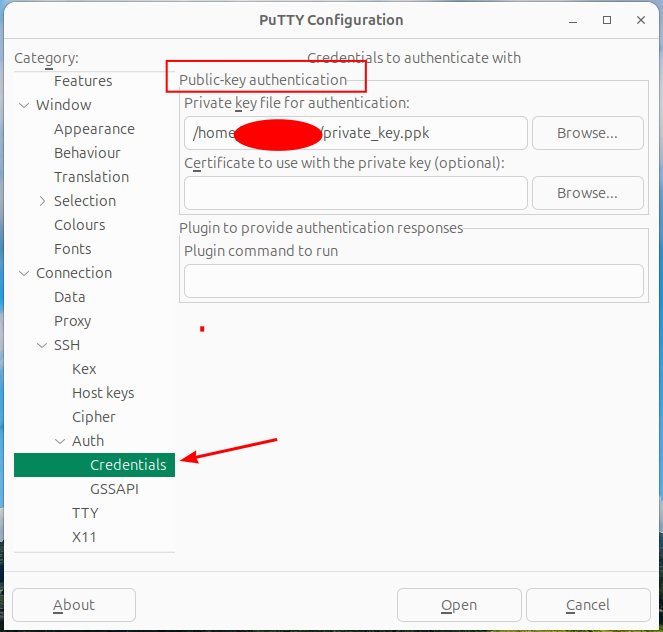
Using putty, go to connection, auth, credentials and fill in the file path to your private key under “Public Key authentication”. Now when you connect, it will automatically do the key exchange and auto log you in.
Add a passphrase to your private key
For additional security, you can add a passphrase to your key. If the key gets compromised, bad actors will need to crack the passphrase first before they can use the key. It is essentially a password for your key.
This may give you a little extra time, in the event of a compromise, for to generate new keys. It is best practice to add a passphrase when you create a key pair.
To clear a passphrase, just hit enter, when it prompts you too add a phrase.
ssh-keygen -p 
Automatically present your private key
If you add a passphrase to a key you will be prompted to enter it each time you logon to a remote server. If you have multiple servers to login to, it can become a burden.
The solution is to temporary store your passphrase. It will only be kept as log as the current session is running. If you logout of you session the temp file is auto removed.
It will be auto presented on login by running two small built in programs by using these commands.
eval $(ssh-agent)
ssh-add /home/username/.ssh/id_rsa
Use a key other than the default
You can specify the file path to a specific key or if it is not stored in the default location by using the -i switch.
$ ssh -i ~/.secret/pvtkey.key username@hostname-i = identity file (aka. private key)
Troubleshoot File Permissions
- Verify .ssh and authorized keys belong to the correct user. chown -R user:user ~/.ssh
- Check permissions of files.
- Authorized_keys = 644 = loaded on the remote servers you are connecting to
- .ssh = 700
- public key = 644
- private key = 600
- known_hosts = 644
- home directory = /home/user = chmod go-w /home/user
- restart ssh after permissions update = $ service ssh restart
Remove a host from authorized_host file
If you replace a remote host that you connect to and reuse the IP address or the host name. they next time you connect you may get an error. This is because the remote host fingerprint has changed. The older fingerprint needs to be removed and and new fingerprint needs to be installed (see above).
ssh-keygen -f "/home/username/.ssh/known_hosts" -R [IP of host to remove]