
Introduction
PPA stands for Personal Package Archive. The primary purpose of a PPA is to provide a way for developers to distribute their own software. PPA are stored on Launchpad.net, which is the official website for PPA’s and is managed by Canonical. PPA’s can be created by anyone and you should only install a PPA from a trusted developer. Use at your own risk.
A secondary purpose of PPA’s is for updating well known software. When Ubuntu reaches out to the official archive repository to get updates, these packages are often outdated and do not contain the latest available software. To get the most recent version, you can set up and install an appropriate PPA. Then, when you run the update command, your host will reach out to both the official archive and the PPA. Whom ever has the most recent software available, will get download and installed on your host.
Typically, each PPA has a GPG key that needs to be installed. Each time an update is run, the keys are exchanged, to verify that you have connected to the correct repository, prior to any downloads. The key should be automatically installed with the initial PPA installation setup.
After a PPA is initially setup. It should survive any system reboots. If you need to disable the PPA for any reason, you can open the PPA file under /etc/apt/sources.list.d/ and comment out the line calling the PPA. Then run an ‘apt update’ again, before running ‘apt upgrade’.

Example PPA Install & Setup
We will be using the popular PPA Apache2 for installation. This is a well known PPA and is maintained by ondrej, a Debian developer. So, it should be safe.
- apache2 -v (Note the current installed version).
- sudo apt -y install software-properties-common (to install a PPA, the add-apt-repository command is needed).
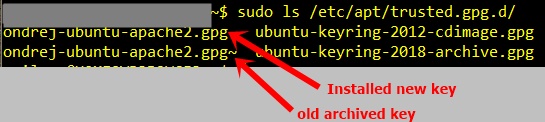
- sudo ls /etc/apt/trusted.gpg.d/ (Check the key was installed).
- sudo add-apt-repository ppa:ondrej/apache2 (The GPG keys are also installed w this command).
- sudo ls /etc/apt/sources.list.d/ (verify the package was installed).
- sudo apt update
- sudo apt install apache2
- apache2 -v (verify that the new version is installed).
- service apache2 restart (restart the service).