I use PuTTY as my primary terminal program. For one thing, it will hold open an SSH session all day and not time out (unlike PowerShell). It is easy to customize the look and feel of your Shell session. Finally, you can save your session settings for subsequent logins.
My top recommendations are to save your login name, private key, and change the font size and color. It is relatively easy and once you set up these, you’ll be grateful for the amount of time saved.
Save your login name
To prevent having to type in your login name each time you start a session, go to Connections > data > add your username on the right side.
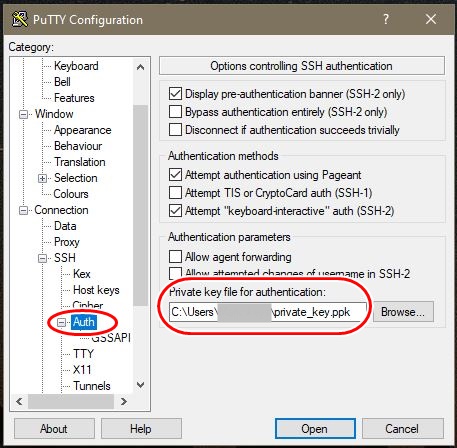
Add the path to your private key
If you want to login to a server without typing in a password, add the path to your private key in a saved session. This is a good method if you only log into a few servers. As, each server needs to have a separate saved session. If you have more than a few servers, you should run ‘Pagent’ to present your key upon each server’s login request.
To add the path to your private key, go to Connections > SSH > Authentication and provide the path to your private key.
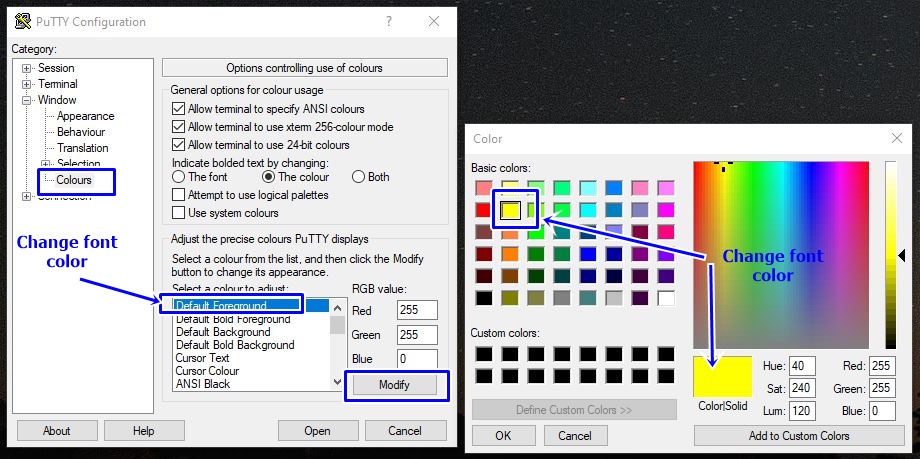
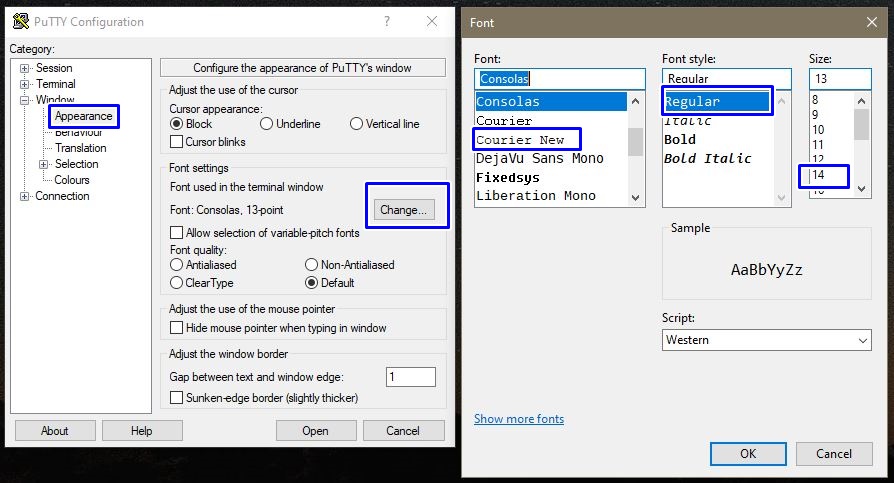
Change the font color & size
To make things easier to read you can enlarge the font size and change the color. Select Colors > Default Foreground > Modify > Pick a color.
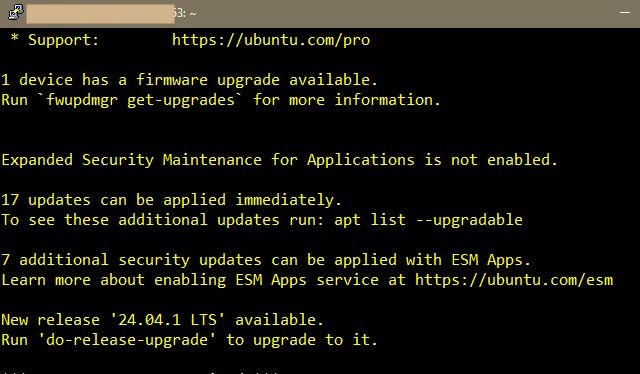
Now when you open putty, it is easier to read.
For font size, you can change it by going to Appearance > Change > and Select the options.
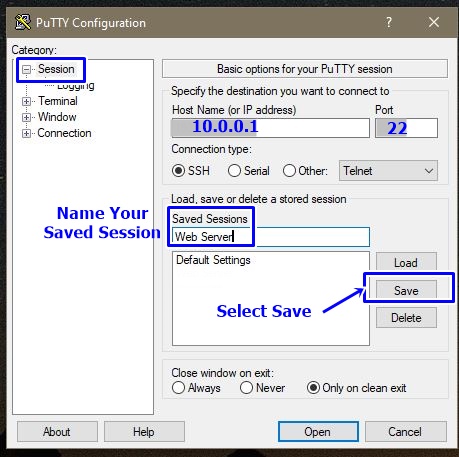
Save all of the options to a session
After you have all everything set up the way you want, then save the setting as a session. Select session > enter an IP & port, Give it a name (like the hostname of the server), in my case I am just saying “Web Server” > and hit “save”.
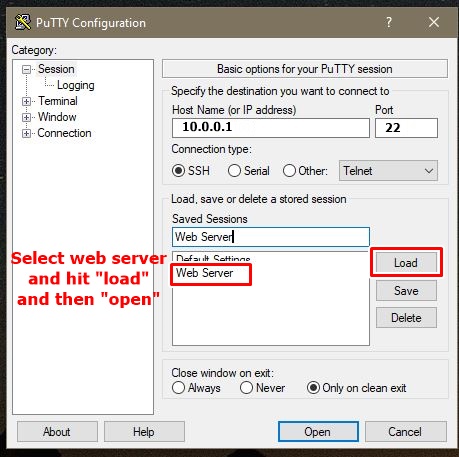
Now when you want to start an SSH session with your web server, just launch putty, hit “load” and then “Open”. It will take you right into a session, no need to enter a username and password.
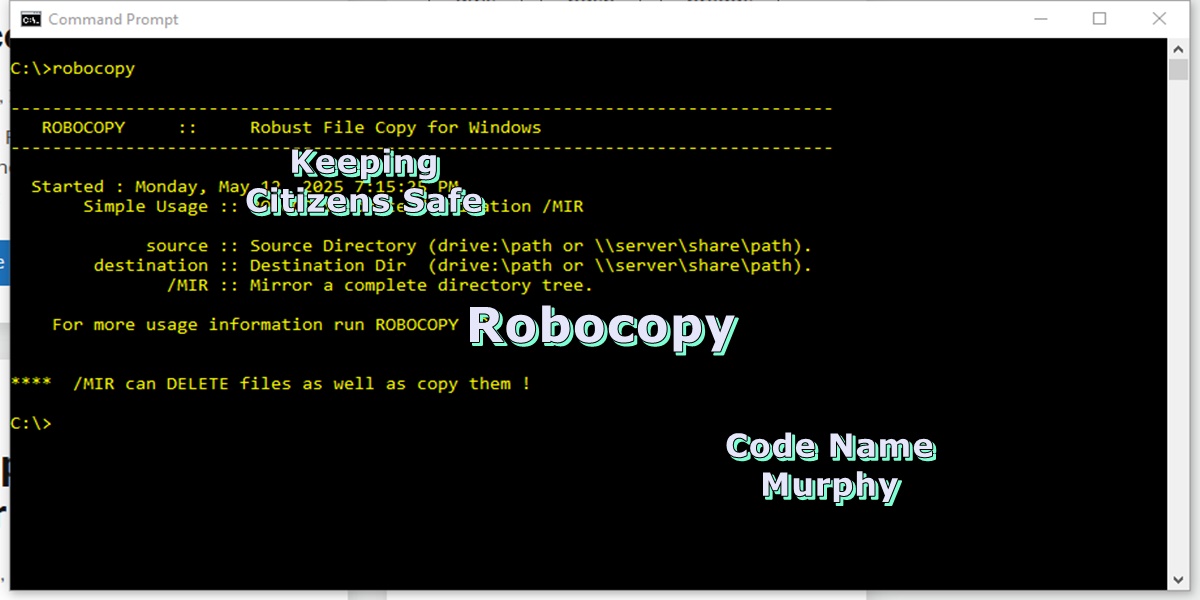
Robocopy (Robust Copy) is a command line tool for copying files in Windows. It replaces the older ‘copy’ command. It contains many new features and can copy files both to an external hard drive or a remote computer.
Before you can copy files to an external hard drive, you need to create a folder on the destination drive first and set the permission on that folder to ‘Everyone’ (see below). I like to somewhat mirror the folder structure of the source and destination files. It makes for an easy reference, when you need to look for the files on the backup.
Command Layout
The three primary copy switches are /E, /S, and /MIR. They will copy just the data, attributes, and timestamps (/COPY:DAT), and not file permissions. The default behavior (not using any switches) of robocopy is to copy only newer files and overwrite the older files at the destination.
The basic format of the command.
robocopy <source directory> <destination directory> <file to copy> <switches>
If you are copying files you are not the owner of, you will need to run the the command prompt as an Administrator and use the /B switch to override the file and folder permissions. You will typically want to use the /Z if coping files over a network and you want to exclude Hidden and System files. The /TEE switch is only necessary if it is an attended backup. Finally, I like to drop a log file in the backup folder in case I need to review anything.
Copy Switches
/L Test the command before you execute it.
/S Do not copy empty directories.
/E Copy all directories, including empty ones.
/MIR Sync a directory. (Caution! If a file is deleted in source, will be deleted in destination).
/B Copy in backup mode. Copy all files regardless of permissions. (Needed if copying files other than your own. Run command prompt as an Administrator).
Network Switches
/Z Use Restart mode, Start copy where you left off. (Needed when possible network interference).
/ZB Use Restart mode & Backup mode. (Needed when coping over a network).
/W:2 Wait time between retries. (Needed when copying over a network).
/R:1 The number of retries, if the file is locked. (Needed when coping over a network).
Exclude Switches
/XA:H Exclude files with the attribute Hidden. (Typically want to use this switch)
/XA:S Exclude files with the attribute System. (Typically always want to use the switch).
/XA:SH Exclude System and Hidden files (Needed when coping a User’s Profile).
/XJ exclude junction points. (Needed when coping a User’s Profile).
/FTT format in FAT32 File system. (Needed if backing up files to a Linux host).
/XD exclude directory. Use if you want to exclude some Hidden files and not others.
Logging Switches
/NFL Don’t log file names of copied files.
/NDL Don’t log directory names. (Include if using a log file).
/NP Suppress % copied output to a log file. (Include if using a log file).
/LOG:/F:\backup.log Writes output to a log file.
/LOG+:F:\file.log Append output to an existing log file.
/TEE Write output to the console window AND the log file.
Get Help
robocopy /?
Copy Files to an External Drive
Copy one or two files. If you have spaces in the file path, be sure to enclose in quotes.
Copy a user’s profile (MIR), exclude the junction points (XJ), system files (XA:S), and the user’s “AppData” folder (XD). Suppress the percent copied results (NP). Junction points are a kind of soft link or a shortcut. The copy process could get stuck in a copy loop if you do not exclude. This will still copy any other hidden files. Output results to screen and log file (TEE & LOG).
Begin by plugging in a USB stick into any open port on the PC. In our example, it shows up as “Drive F”. Now, make a new folder called F:\backups.
Set the permissions on the new folder to ‘Everyone’ by right clicking on the folder, go to properties, security tab, select add group or username, and select check names. Be sure to verify that the “Everyone” has all the allow permissions.
Now, any folders or files copied to the “backup” folder during the backup, should inherit the same permissions. (i.e. Everyone).
If you don’t do this and you need to access the files on a PC other than the original computer, you may not be able to open the files. This is because you are not logged in as the original user that ran the backup. But, with folder permissions set to Everyone, you can plug the external drive or USB stick into any computer, and you will have full access to the copied files.
Make a Backup Script
We will backup the contents of a generic folder and two user’s profiles. It will copy to an external hard drive and also to a remote windows computer. For this example, we are logged in as a user called Jack and it is an “admin” account, so we can be granted rights to copy files of other users.
First, we will start by coping all files in a folder called “Data”. Since we don’t know who owns this folder, we will use the /B switch to overwrite any potential permissions issues. Finally, we will make a log file but exclude the percent copied for each file. As this unnecessary clogs up the log output.
rem backup.bat
robocopy C:\Data F:\backups\data /MIR /B /NP /LOG:F:\backup.log
Next, we can now copy Jack and Jill’s profiles. Jack’s profile, we will exclude all hidden files, system files, and junction points. Since his “AppData” folder is already hidden, we do not need to specifically exclude it.
In Jill’s profile, we have several hidden files that we want to copy that contain her SSH keys. So, we will not create a blanket exclusion for all hidden files. Instead, we will exclude her “AppData” folder specifically. Finally, we will add to the previously created log file, but again we will exclude the total percent copied. Also, we need to add her file using the /B switch to copy in backup mode.
Finally, copy the same files to a remote computer for a secondary backup. As before, we will use the /MIR switch to make an exact duplicate folder tree, /B to run in backup mode and exclude the System, Hidden, Junction Points, and specifically exclude Jill’s “AppData” folder. Also, we use the /Z (restart mode), /R (retry) and /W (wait) in case there are network issues.
Save the script to Jack’s desktop as backup.bat. To run the script, open a command prompt as an Admin, and navigate to Jack’s desktop. Type the script name and hit enter. To run the script nightly, you can set up a scheduled task to execute.
A great way to backup your Linux files is through automation. Linux contains many built in commands that can be used to automate this process. In this article, we will write a simple bash script to backup critical files to a remote host.
For this to work, a user account is needed on both hosts to transfer the files. The sending server will need the private SSH key and the receiving server will need the public SSH key. These keys are used to automatically authenticate to the remote server. Creating and deploying a SSH key pair for authentication is beyond the scope of this article.
The script will use the scp command as it uses SSH underneath the hood. This means it will natively automatically check for an identity file stored under the user’s account at ~/.ssh/config. When creating the SSH credentials, do not add a passphrase to the private key.
Secure copy (scp) command is good if you just want to copy a single file. You can use the -R switch to copy all files in a directory. If you need to backup multiple files, you can modify the script and just add additional variables, update checks, and then add more scp commands.
If you need to transfer entire directories consider using the rsync command. Rsync like scp should automatically use the ~/.ssh/conf file by default. However, rsync sometime has issues using an identity file, so do proper testing.
Finally, Consider setting up a CRON job to run the script nightly.
Procedure
Lets build a script on server1 and we will be connecting and coping our file to server2. First, set up the head of the script and call bash and add any comments.
#!/bin/bash
# backup.sh
Next, let’s set up the script variables.
DATE=`date`
DAY=$(date -d "1 day ago" +%d)
MONTH=$(date -d "1 day ago" +%b)
YEAR=$(date -d "1 day ago" +%Y)
SRC_DIR="/var/logs/$YEAR/$MONTH"
DST_DIR="/user1/backup/$YEAR/$MONTH"
FILE="important-file-$DAY.sql"
Next, lets run a check on the remote server and test if the file path exists!
# test if path exist on remote server.
# -d=test for file & if file exists is it a dir?
TEST=`ssh server2.company.com "test -d $DST_DIR && echo 1 || echo 0"`
if [ $TEST = 0 ] ; then
     echo "$DATE : $DST_DIR was not found. Making ..."
     # -p=make all missing directories in the file path.
     ssh server2.company.com "mkdir -p $DST_DIR"
else
     echo "$DATE : $DST_DIR was found."
fi
Managing user and groups in Linux is an essential administrative task. We will cover the manual method to create a new user and add that user to a group. Also, remove that user in a multi step process. Finally, we will cover selective tasks concerning Groups.
There is a separate article concerning adding the same user to multiple servers using Ansible. We will not duplicate that information here.
Create a User Account
First, get a list of all users on the host.
sudo cat /etc/passwd
Now, create a new user called mark.
sudo adduser mark
Remove a User Account
If we want to fully remove a user we will need to follow several steps. Also, the user’s files on other remote systems will need to be manually searched for and removed or have the ownership changed.
You can not remove an account if the user is currently logged in. This is because the user will have existing running processes.
Lock the user’s account, so they can not login.
sudo password -l mark
Backup the user’s account data.
sudo tar -zcvf /nas/backups/accounts/removed/mark_011225.tar.gz /home/mark/
See if the user has any running processes and kill them.
sudo ps -u username
sudo killall -9 -u username
Remove the user’s crontab jobs.
sudo crontab -r -u username
If necessary, cancel any running print jobs. (Linux print remove).
sudo lprm -U username
Assign Mark’s files to another user named Tom.
sudo find / -user mark -exec chown tom:tom {} \;
-exec = execute script. chown tom:tom = Change ownership to tom. {} = for each file that is found \ = Terminate script when done.
Since we will be deleting the home and mail spool directories, and we have already made a backup, we do not need or want to search those directories by changing the file permissions right now. This will prevent us from deleting them and lead to orphan files. So we will modify the above command to exclude those. We only want to change ownership for files outside of those two directories.
-p = path to exclude -prune = Do not search specified path. -o = OR
Finally, remove the user’s account. Some users like to use the deluser command and some like to use the older userdel command. They do essentially the same thing. I am using deluser, as it is a higher level command and also deletes the user’s /home directory and mail spool.
sudo deluser --remove-home mark
–remove-home = removes /home and /var/spool/mail. –remove-all-files = removes /home,/var/spool/mail, and attempts removal of all other files.
Lastly, check to verify there are no remaining files assigned to the user.
sudo find / -user mark -group mark
Create a Group
Lets create a group called analyst.
sudo addgroup analyst
Add a User to a Group
Let’s add the new user mark to the analyst group. NOTE: You must be a member of a group before you can add others to the same group.
sudo usermod -aG analyst mark
-a = Append -G = Group
NOTE: For centOS systems, need to run the command ‘$ usermod -aG wheel <user>’
Review Group Memberships
Lets see who is in the group analyst and see what groups the user ‘mark’ is in.
sudo cat /etc/group | grep analyst
sudo groups mark
Remove a User from Group
We can remove the user mark from the analyst group. The command is not as clean as adding a user. It is not obvious that these are group commands. You can use either of the two below commands.
sudo deluser mark analyst
sudo gpasswd -d mark analyst
-d = delete user from group.
Change a File’s Group Permissions
Next, lets change ownership of a file to the group ‘analyst’. Although there are other methods, I prefer the one shown below, as it is more granular. After you change a file’s group permissions, users will not be able to access the file until they log off and back on again.
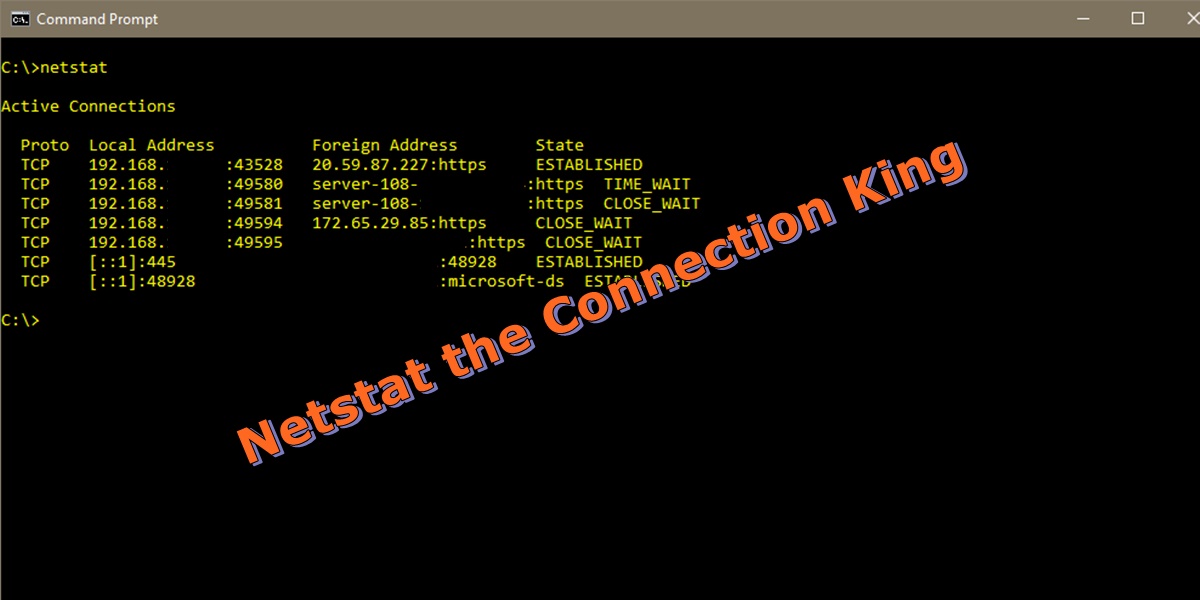
Netstat is a built in utility typically used to troubleshoot remote connection issues. It is also be used to see what external IPs and URLs your computer is actively communicating with and to what ports are passively open waiting for a connection. To run netstat, launch the Command Prompt in administrator mode.
It is important to remember that running the command is a one and done. It does not auto refresh unless you tell it to using a switch. To get a list of switches, run “netstat /?“. The most important for netstat switches are:
-a = Display all connections and listening ports -b = Display the executable involved. -f = Display FQDN. -n = Display IP and ports in number format. -o = Display process ID associated with the connection. -r = Display routing table.
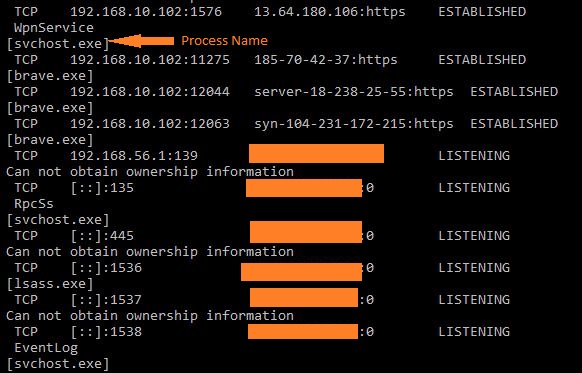
Let’s go over some commands. First, ‘netstat -ab’ is unusually slow to provide results and the results are not in a easy to read format. For this reason many users do not like it. But it will provide the process name that opened or established the connection.
netstat -ab
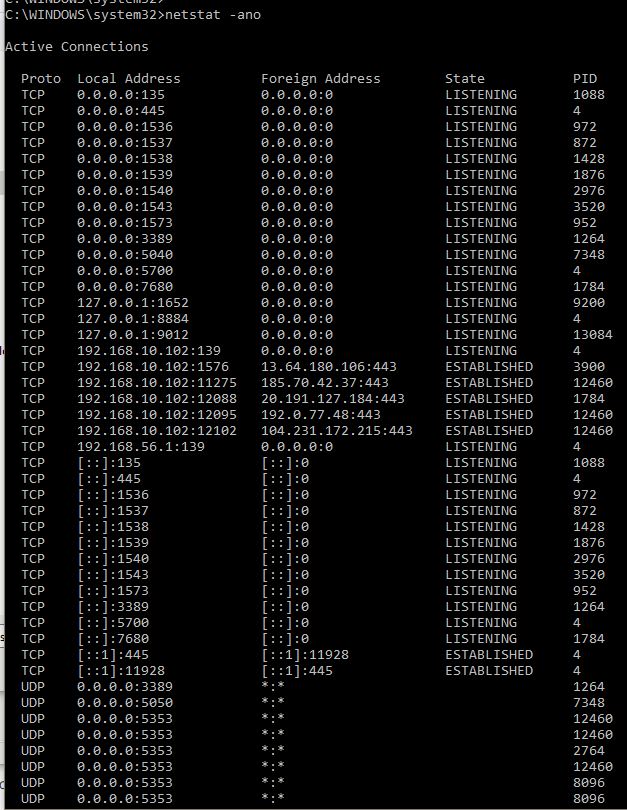
Next is ‘netstat -ano’. It provides very fast results, but does not provide the name of the running service. However, you can get the process ID’s and then lookup the running process in task manager to find the service or executable. Finally, you can lookup up the foreign addresses in an online URL lookup to find the ‘whois’ or the IP registration.
netstat -ano
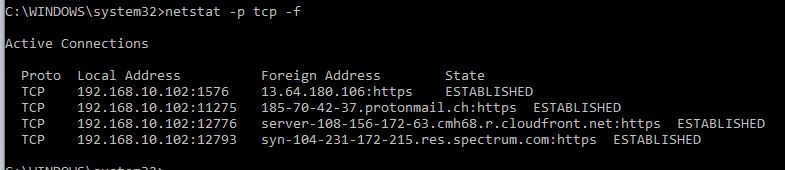
Display the TCP active connections with the FQDN.
netstat -p tcp -f
You can pipe the results from netstat to include only specific outputs.
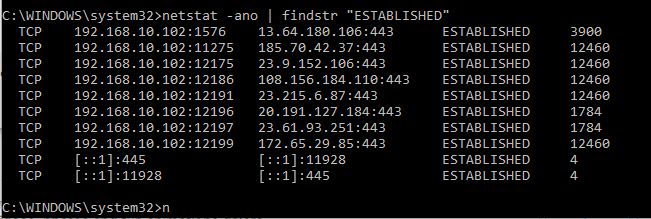
netstat -ano | findstr "ESTABLISHED"
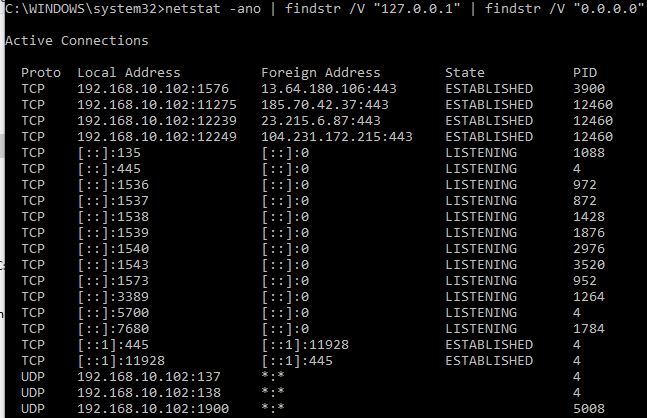
You can pipe to exclude results by using the /V switch.
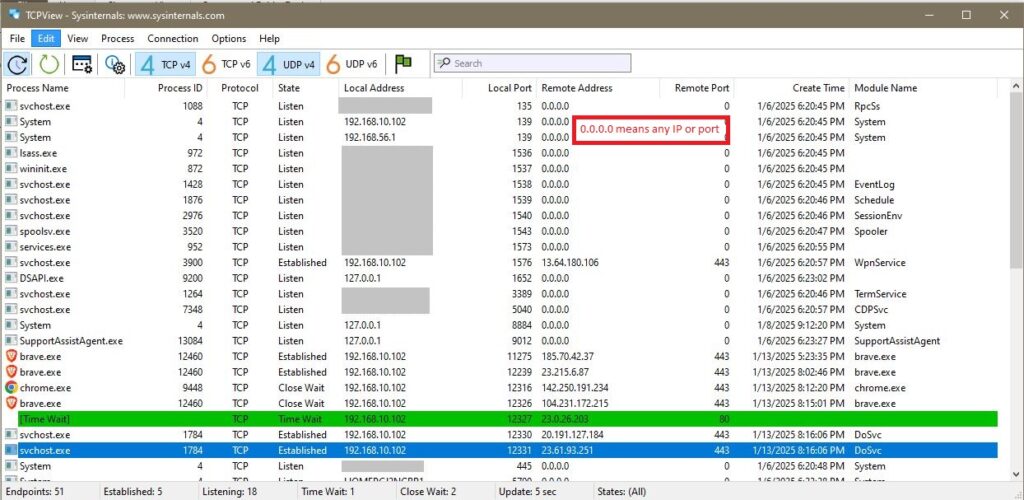
Think of TCPView (or the older CURRPorts) as a netstat GUI interface. TCPView is produced by Microsoft System Internals and is actively supported. It is easier to read then the command line, auto refreshed every 2 seconds, and provides both fast results as well as the process name.
You can quickly track down what service is attempting to make an external connection, what remote IP or URL it is communicating with, and over what port. The results can be combined with some google searches to get a complete picture. I find it easier than trying to interpret the netstat command line results.
The color scheme is tricky. Red means a connection is about to close, green means a connection was just opened, and yellow means a connection has just refreshed. Notice the green bar in the picture below.
1 cup sugar
1 cup water
4 cups fresh cranberry (12 oz package)
Optional: pecans, orange zest, raisins, currants, blueberries, cinnamon, nutmeg, allspice
Place cranberries in colander and rise them. Pick out and discard any damages cranberries. Put the water and sugar in a medium saucepan on high heat and bring to boil. Stir to dissolve the sugar. Add cranberries to the pot and return to boil. Lower the heat and simmer for 10 minutes or until most of the cranberries have burst.