Ubuntu by default has two or more workspaces activated by default. However, most people only ever use one workspace. When working, sometimes, the other workspace will pop out. This be behavior is obnoxious and unwanted by most end users.
A quick solution is to just turn off all workspaces, except one.
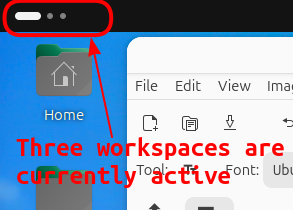
Firtst, find out how many workspces you have by checking the upper left corrner.
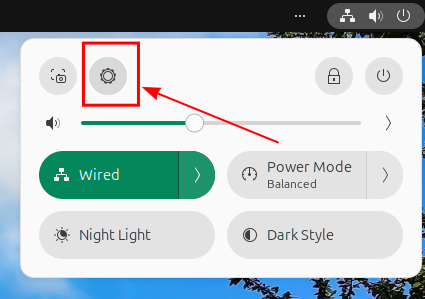
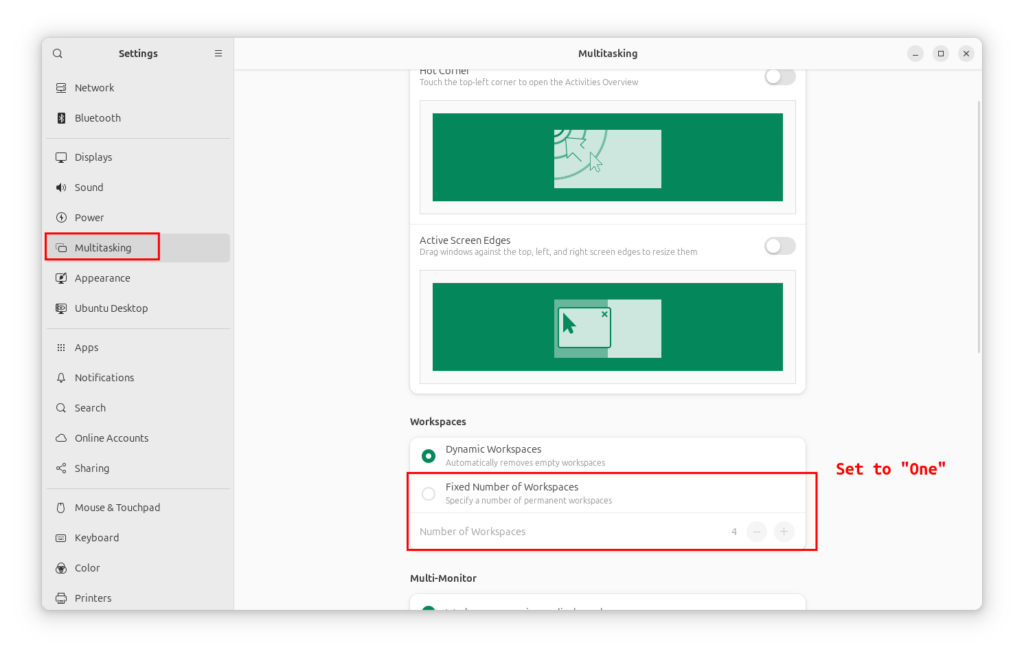
Next, go to Setting, Multiptasking, Workspaces, set fixed number of workspaces to One.
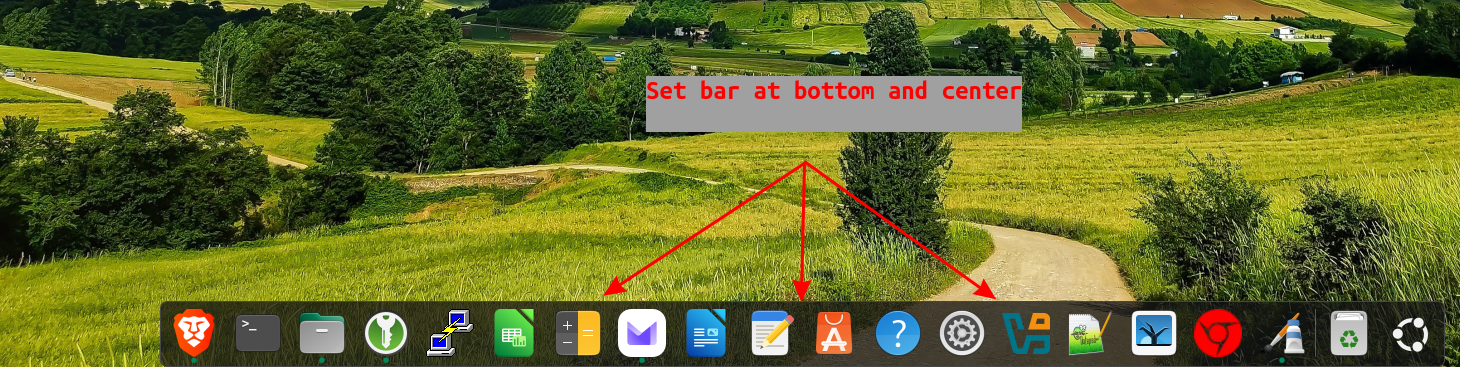
Move task bar to bottom and center
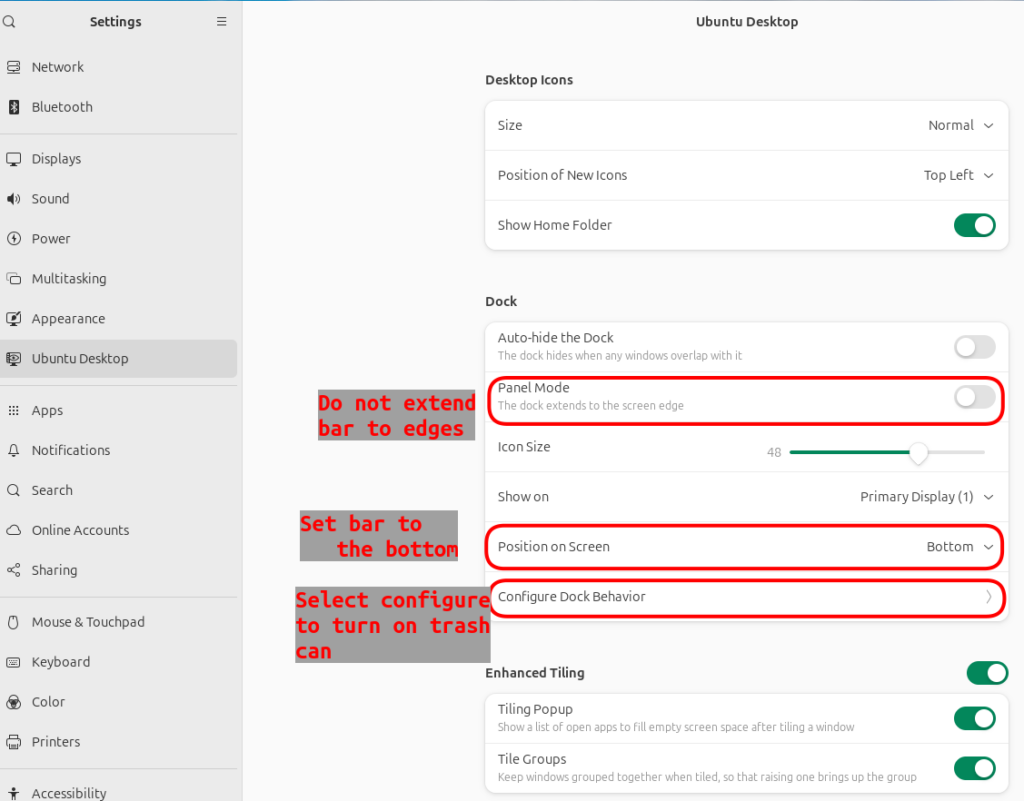
Default ubuntu behavior is to place bar on left side of screen. I like to display my dock bar at the bottom and also show the trash can.
You can extend the bar to the screen edges and this will push all icons to the left. But I persoanlly like to just center everything.
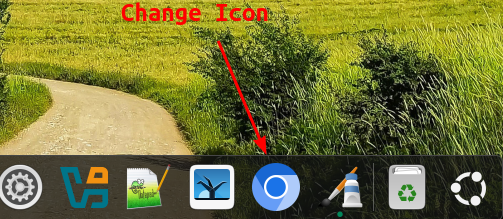
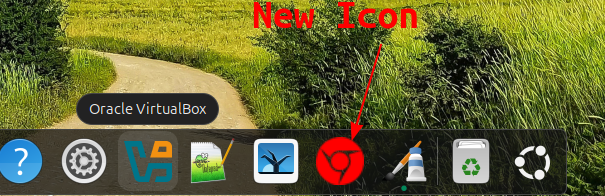
The question always arise is how can I change the icon images on my desktop in Ubuntu to ones I am familiar with. In this case, we are changing the blue Chromium to a Red Chromium icon.
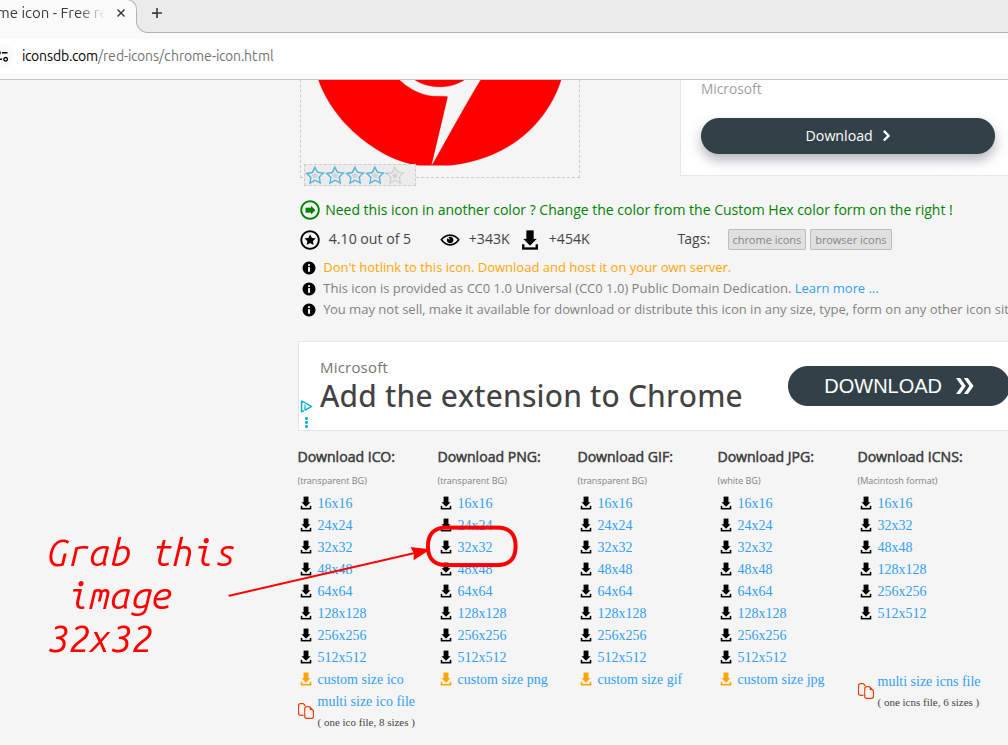
Download New Icon
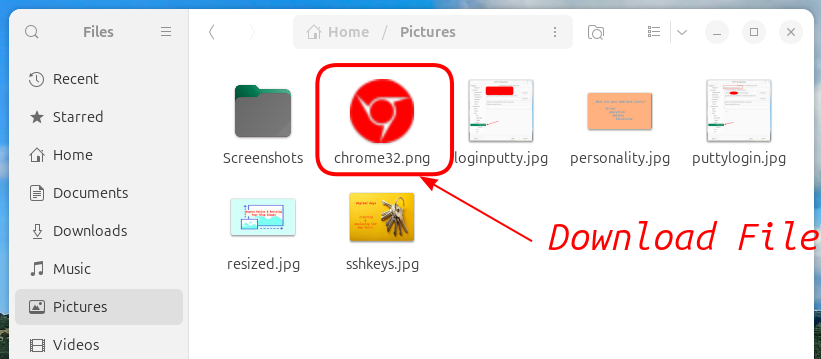
Download a png file of the new icon image and save to your Pictures folder. The file size shouldbe 32px x 32px.
Find the App Launcher File
Each installed app has a launcher file typically named appname_appname.desktop. It could be stored in a number of locations depending on how it was installed. Either manually or by RPM. The two main RPM for Ubuntu are Snap and Apt-Get. Snap is now the default Ubuntu RPM for applications.
~/.local/share/applications (user specific override system launchers).
/home/snap/chromium/current/ (User profile, cache, user level data).
/snap/chromium/current (the actual app itself).
In our case the app was installed via snap so the original app launcher file is located in /var/lib/snapd/desktop/applications/.
Edit Config File
If we modify the original file locations, when an update occurs this file is overwritten with a new copy. So, any change will not survice a reboot or software updates. They are not persistant.
Instead, we will create a file under the user’s folder and make any custom changes to that copy. The order of execution by default is any local fodler, then the original file location.
First, make an applications directory under the local account. Next, make a copy of the appname_appname.desktop file in the original snap directory and place it in the new directory.
-p = create a directory and any necessary parent directories in the specified path, even if they don’t already exist.
Next, open the new chromium_chromium.dekstop file.
vim ~/.local/share/applications/chromium_chromium.desktop
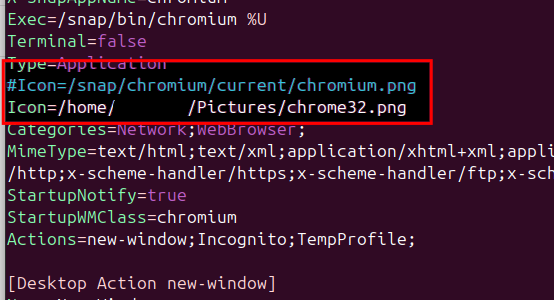
Find the line marked “Icon”, and make a copy of the line, then comment out the original. Next, modify the line to the path containing your new icon file.
You must consider both size and quality when creating a a blog image. Images have multiple conflicting interests. You must consider the specific blog post topic and the theme of the web site. Next you need to create an image that has a fast load time, often the image must be compressed, or a specific file format and finally it must be a quality image that makes the page appealing. We need to find the right balance and consider all these options.
The most important image of any post is the main image displayed at the top of your blog post. This image is often called the “featured image”. I will explore some of observations that will give you some guidelines and suggestions to create these featured images.
Make note that I will often reference exact image pixel dimentions. They will be displayed in the format of (680×382), meaning 680 pixels x 382 pixels. Generally speaking, you want the length of the featured image to be the wide of the main posting.
General rules for any image
Most often the best way to create a fast load time is to use compress images like jpeg and to use image ratio’s that produce a smaller image. But, smaller images tend to not look as sharp on high resolution monitors. Also, you can try using less colors when making an image.
Only crop from larger images images.
When making a custom images, use less colors.
Only resize larger image to smaller, not smaller to a larger.
Keep images < 200 kb for fast load time. Max can be 500 kb.
Word Press size recommendations
Thumbnails 150 x 150
Medium 300 x 300
Large 1024 x 1024
Image Resolution
You may see references to this term. Although it is often discussed, I have not personally found it to be a very useful term and do not generally use it when creating iamges. I have included this concern as a reference only, in case you come across it.
Image resolution is often described in dots-per-inch (dpi). Older displays are typically 72 dpi and modern displays are 200 – 400 dpi.
Aspects ratios
I feel that the best aspect ratio is 16×9 or 4×3. I choose based on the type or article I am writing. Ratio is based on wide x height of the image. So, for the fist example it is 16 wide x 9 high. the 800×450 is a good choice if most audiances will be accessiing by mobile devices.
16×9: 1200×675 or 800×450 or 680×382
4×3: 800×600
2×1: 800×400, 600×300, 1170×585 (Slider)
3×2: 800×600
1×2: 1200×600
4×1: 728×90 or 1900×250 (Header)
File Formats
I generally save my files in jpeg format, they have good compression and can saved in native format by most photo editors.
jpeg = General photos
gif = Animations and product photos.
png = Graphics requiring background transparency like icons and logos.
webP = Product banners, and featured images, good replacement for jpg.
Guidelines
Background: 1920×1080, ratio 16:9, size < 20 MB
Header: 1280×720, ratio 16:9, size < 10 MB
Featured Image: 800×450, ratio 16:9, size <200 kb
Featured Image: 1200×900, ratio 4:3, size < 200kb
Banner: 600×160 (regular), ratio 15×4, size < 150 kb.
Logo: 100×100 (square), ratio 1:1 ratio, size < 100 kb
Most folks are familiar with logging into a device or a a web page using a username and password. But a more secure method is to use a public private key exchange.
Ubuntu comes preinstalled with all the tools necessary to create public private keys. The private key is kept hidden and secure. The public key will be give out freely. It is recommend that you rotate your key pair frequently as a safety precaution.
In this article, we will look you how to generate a key pair, save your private key to a secure location, copy your public key to a remote host, troubleshoot, and introduce an auto login auto method.
Create a key pair
Login to the Linux computer that will be the device that you will connect from. This computer is the main control computer and where you will save your private key.
Open a command line prompt and run …
ssh-keygen -t rsa
After the keys are generated, they will be stored under:
/home/username/.ssh/id_rsa (private key).
/home/username/.ssh/id_rsa.pub (public key).
Store the fingerprints of the remote PC
To get started using the key exchange method for connecting via SSH, you must have an existing user account on the remote server that you want to connect too.
But, before we can use the keys, we need to first store the remote server’s finger prints. We do this by sshing to the remote server three times.
Server’s host-name (i.e. server1).
Server’s FQDN (server1.mycomapny.com).
Server’s IP address (192.168.10.100).
ssh username@hostname, FQDN, and IP address
Each time you ssh, you will be cautioned that the server is unknown and do you want to store the fingerprint. Select yes.
The remote server’s fingerprints will then be stored in a file under the specific user at /home/username/.ssh/known_hosts.
Push the public key to the remote host
Next, we need to push our public key to the remote server.
ssh-copy-id ~/.ssh/id_rsa.pub username@hostname
This will create the ~/.ssh/authorized_keys directory on the remote server. If it does not exist, it will create it and place the public key inside it.
Connect to remote device using key exchange
Once you have created your keys, stored the remote server finger print, pushed your public key to it, you are now ready to login using the key exchange method instead of a username and password.
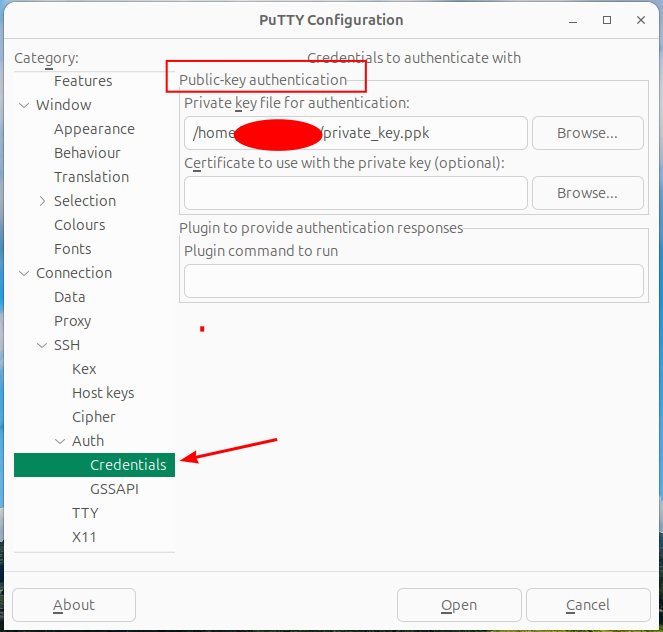
Using putty, go to connection, auth, credentials and fill in the file path to your private key under “Public Key authentication”. Now when you connect, it will automatically do the key exchange and auto log you in.
Add a passphrase to your private key
For additional security, you can add a passphrase to your key. If the key gets compromised, bad actors will need to crack the passphrase first before they can use the key. It is essentially a password for your key.
This may give you a little extra time, in the event of a compromise, for to generate new keys. It is best practice to add a passphrase when you create a key pair.
To clear a passphrase, just hit enter, when it prompts you too add a phrase.
ssh-keygen -p
Automatically present your private key
If you add a passphrase to a key you will be prompted to enter it each time you logon to a remote server. If you have multiple servers to login to, it can become a burden.
The solution is to temporary store your passphrase. It will only be kept as log as the current session is running. If you logout of you session the temp file is auto removed.
It will be auto presented on login by running two small built in programs by using these commands.
You can specify the file path to a specific key or if it is not stored in the default location by using the -i switch.
$ ssh -i ~/.secret/pvtkey.key username@hostname
-i = identity file (aka. private key)
Troubleshoot File Permissions
Verify .ssh and authorized keys belong to the correct user. chown -R user:user ~/.ssh
Check permissions of files.
Authorized_keys = 644 = loaded on the remote servers you are connecting to
.ssh = 700
public key = 644
private key = 600
known_hosts = 644
home directory = /home/user = chmod go-w /home/user
restart ssh after permissions update = $ service ssh restart
Remove a host from authorized_host file
If you replace a remote host that you connect to and reuse the IP address or the host name. they next time you connect you may get an error. This is because the remote host fingerprint has changed. The older fingerprint needs to be removed and and new fingerprint needs to be installed (see above).
ssh-keygen -f "/home/username/.ssh/known_hosts" -R [IP of host to remove]
PPA stands for Personal Package Archive. The primary purpose of a PPA is to provide a way for developers to distribute their own software. PPA are stored on Launchpad.net, which is the official website for PPA’s and is managed by Canonical. PPA’s can be created by anyone and you should only install a PPA from a trusted developer. Use at your own risk.
A secondary purpose of PPA’s is for updating well known software. When Ubuntu reaches out to the official archive repository to get updates, these packages are often outdated and do not contain the latest available software. To get the most recent version, you can set up and install an appropriate PPA. Then, when you run the update command, your host will reach out to both the official archive and the PPA. Whom ever has the most recent software available, will get download and installed on your host.
Typically, each PPA has a GPG key that needs to be installed. Each time an update is run, the keys are exchanged, to verify that you have connected to the correct repository, prior to any downloads. The key should be automatically installed with the initial PPA installation setup.
After a PPA is initially setup. It should survive any system reboots. If you need to disable the PPA for any reason, you can open the PPA file under /etc/apt/sources.list.d/ and comment out the line calling the PPA. Then run an ‘apt update’ again, before running ‘apt upgrade’.
Example PPA Install & Setup
We will be using the popular PPA Apache2 for installation. This is a well known PPA and is maintained by ondrej, a Debian developer. So, it should be safe.
apache2 -v (Note the current installed version).
sudo apt -y install software-properties-common (to install a PPA, the add-apt-repository command is needed).
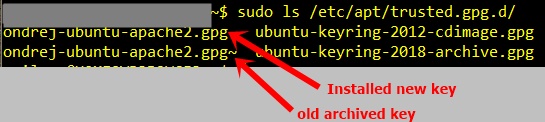
sudo ls /etc/apt/trusted.gpg.d/ (Check the key was installed).
sudo add-apt-repository ppa:ondrej/apache2 (The GPG keys are also installed w this command).
sudo ls /etc/apt/sources.list.d/ (verify the package was installed).
sudo apt update
sudo apt install apache2
apache2 -v (verify that the new version is installed).
I use PuTTY as my primary terminal program. For one thing, it will hold open an SSH session all day and not time out (unlike PowerShell). It is easy to customize the look and feel of your Shell session. Finally, you can save your session settings for subsequent logins.
My top recommendations are to save your login name, private key, and change the font size and color. It is relatively easy and once you set up these, you’ll be grateful for the amount of time saved.
Save your login name
To prevent having to type in your login name each time you start a session, go to Connections > data > add your username on the right side.
Add the path to your private key
If you want to login to a server without typing in a password, add the path to your private key in a saved session. This is a good method if you only log into a few servers. As, each server needs to have a separate saved session. If you have more than a few servers, you should run ‘Pagent’ to present your key upon each server’s login request.
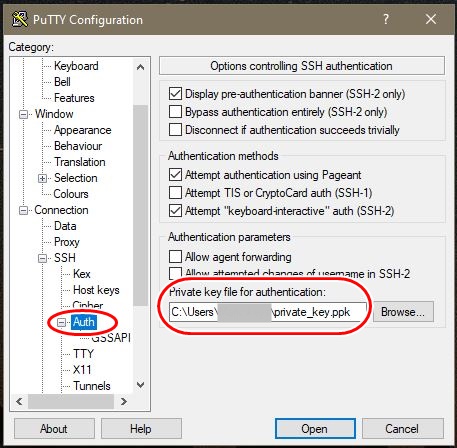
To add the path to your private key, go to Connections > SSH > Authentication and provide the path to your private key.
Change the font color & size
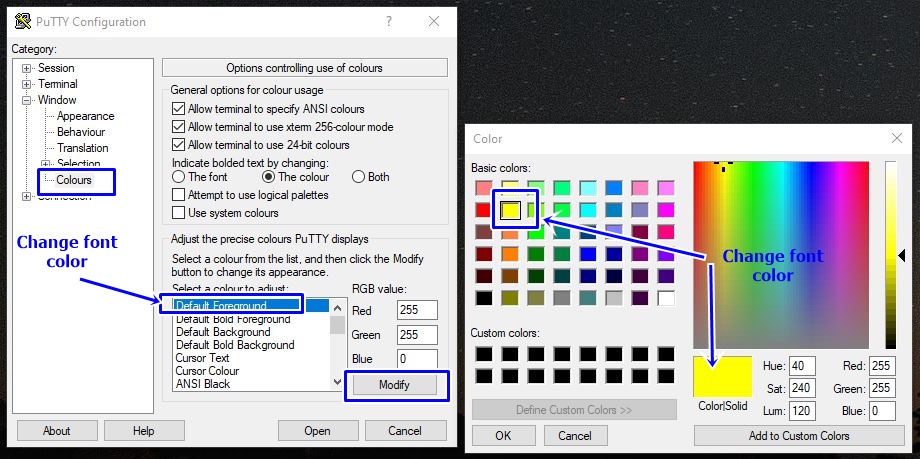
To make things easier to read you can enlarge the font size and change the color. Select Colors > Default Foreground > Modify > Pick a color.
Now when you open putty, it is easier to read.
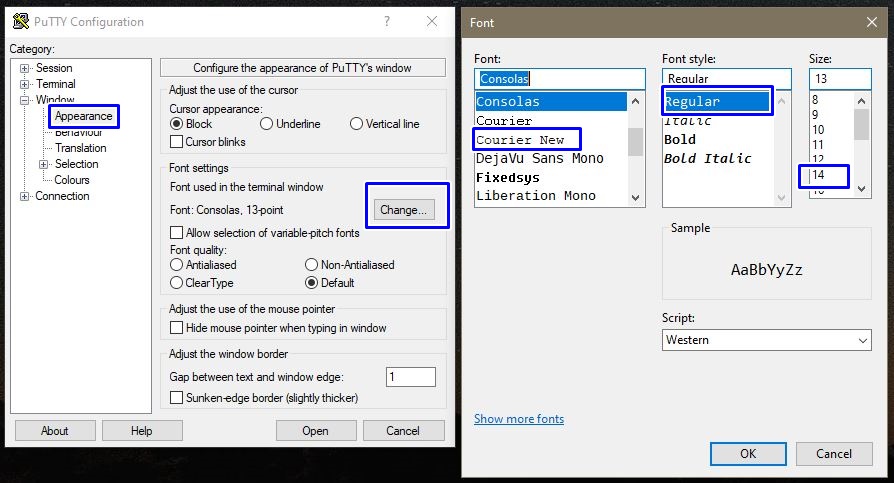
For font size, you can change it by going to Appearance > Change > and Select the options.
Save all of the options to a session
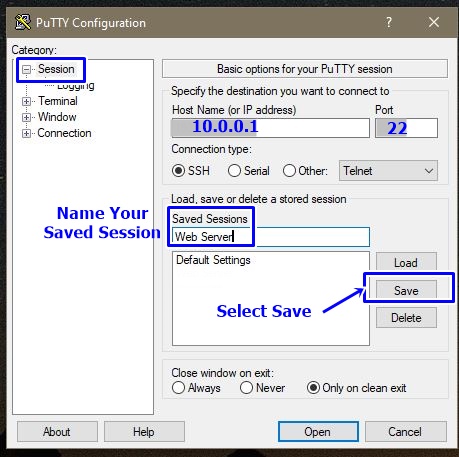
After you have all everything set up the way you want, then save the setting as a session. Select session > enter an IP & port, Give it a name (like the hostname of the server), in my case I am just saying “Web Server” > and hit “save”.
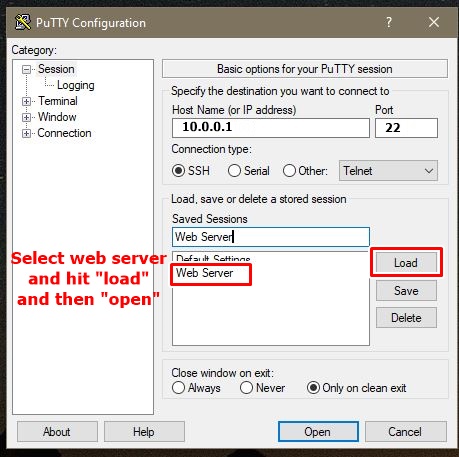
Now when you want to start an SSH session with your web server, just launch putty, hit “load” and then “Open”. It will take you right into a session, no need to enter a username and password.