Category: Tech

  • Manage Users & Groups

    Manage Users & Groups

    Introduction

    Managing user and groups in Linux is an essential administrative task. We will cover the manual method to create a new user and add that user to a group. Also, remove that user in a multi step process. Finally, we will cover selective tasks concerning Groups.

    There is a separate article concerning adding the same user to multiple servers using Ansible. We will not duplicate that information here.

    Create a User Account

    First, get a list of all users on the host.

    Now, create a new user called mark.

    Remove a User Account

    If we want to fully remove a user we will need to follow several steps.  Also, the user’s files on other remote systems will need to be manually searched for and removed or have the ownership changed.

    You can not remove an account if the user is currently logged in. This is because the user will have existing running processes.

    Lock the user’s account, so they can not login.

    Backup the user’s account data.

    See if the user has any running processes and kill them.

    Remove the user’s crontab jobs.

    If necessary, cancel any running print jobs. (Linux print remove).

    Assign Mark’s files to another user named Tom.

    -exec = execute script.
    chown tom:tom = Change ownership to tom.
    {} = for each file that is found
    \ = Terminate script when done.

    Since we will be deleting the home and mail spool directories, and we have already made a backup, we do not need or want to search those directories by changing the file permissions right now. This will prevent us from deleting them and lead to orphan files. So we will modify the above command to exclude those. We only want to change ownership for files outside of those two directories.

    -p = path to exclude
    -prune = Do not search specified path.
    -o = OR

    Finally, remove the user’s account. Some users like to use the deluser command and some like to use the older userdel command. They do essentially the same thing. I am using deluser, as it is a higher level command and also deletes the user’s /home directory and mail spool.

    –remove-home = removes /home and /var/spool/mail.
    –remove-all-files = removes /home,/var/spool/mail, and attempts removal of all other files.

    Lastly, check to verify there are no remaining files assigned to the user.

    Create a Group

    Lets create a group called analyst.

    Add a User to a Group

    Let’s add the new user mark to the analyst group. NOTE: You must be a member of a group before you can add others to the same group.

    -a = Append
    -G = Group

    NOTE: For centOS systems, need to run the command ‘$ usermod -aG wheel <user>’

    Review Group Memberships

    Lets see who is in the group analyst and see what groups the user ‘mark’ is in.

    Remove a User from Group

    We can remove the user mark from the analyst group. The command is not as clean as adding a user. It is not obvious that these are group commands. You can use either of the two below commands.

    -d = delete user from group.

    Change a File’s Group Permissions

    Next, lets change ownership of a file to the group ‘analyst’. Although there are other methods, I prefer the one shown below, as it is more granular. After you change a file’s group permissions, users will not be able to access the file until they log off and back on again.

    References

    https://linuxize.com/post/how-to-add-and-delete-users-on-ubuntu-18-04/

    https://www.digitalocean.com/community/tutorials/how-to-add-and-delete-users-on-an-ubuntu-14-04-vps

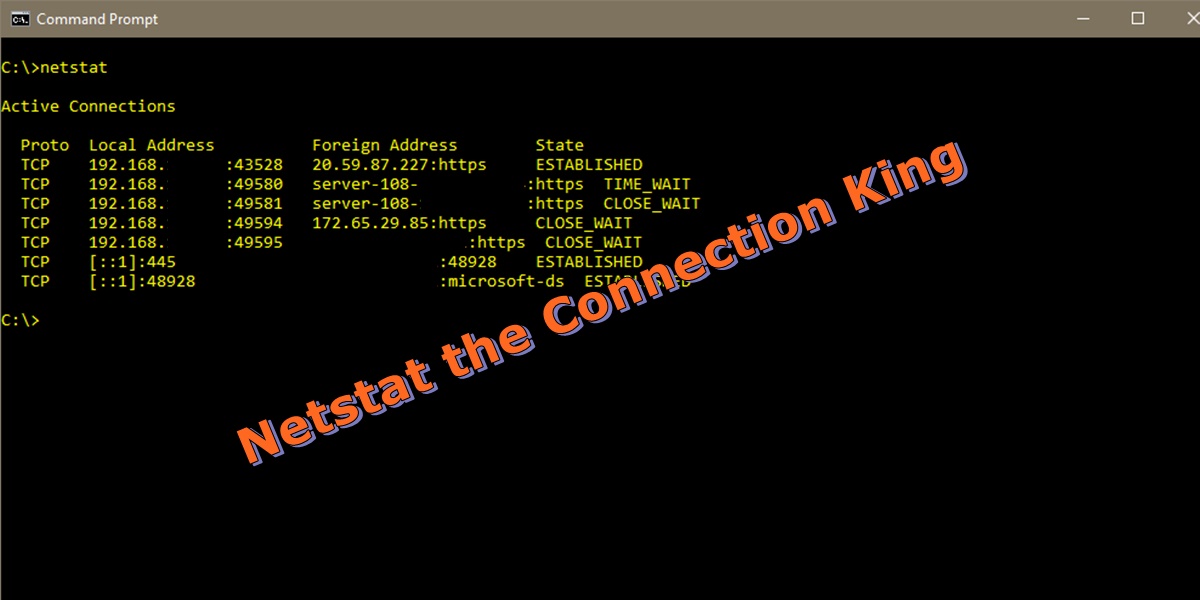
  • Tracking Communications with Netstat & TCPView

    Tracking Communications with Netstat & TCPView

    Netstat on the Command Line

    Netstat is a built in utility typically used to troubleshoot remote connection issues. It is also be used to see what external IPs and URLs your computer is actively communicating with and to what ports are passively open waiting for a connection. To run netstat, launch the Command Prompt in administrator mode.

    It is important to remember that running the command is a one and done. It does not auto refresh unless you tell it to using a switch. To get a list of switches, run “netstat /?“. The most important for netstat switches are:

    -a = Display all connections and listening ports
    -b = Display the executable involved.
    -f = Display FQDN.
    -n = Display IP and ports in number format.
    -o = Display process ID associated with the connection.
    -r = Display routing table.

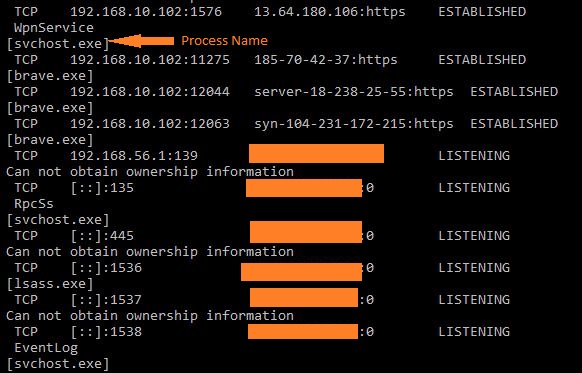
    Let’s go over some commands. First, ‘netstat -ab’ is unusually slow to provide results and the results are not in a easy to read format. For this reason many users do not like it. But it will provide the process name that opened or established the connection.

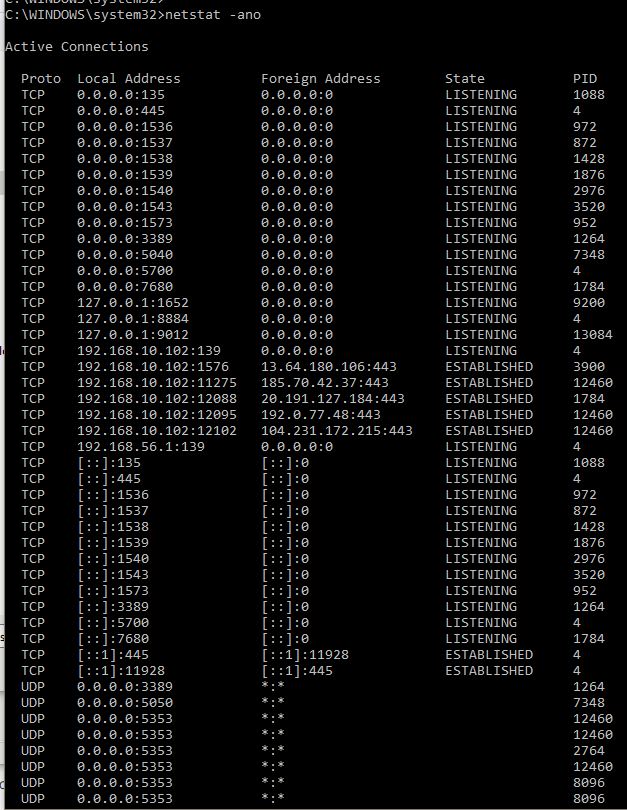
    Next is ‘netstat -ano’. It provides very fast results, but does not provide the name of the running service. However, you can get the process ID’s and then lookup the running process in task manager to find the service or executable. Finally, you can lookup up the foreign addresses in an online URL lookup to find the ‘whois’ or the IP registration.

    Display the TCP active connections with the FQDN.

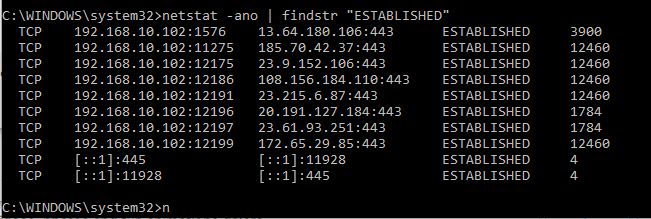
    You can pipe the results from netstat to include only specific outputs.

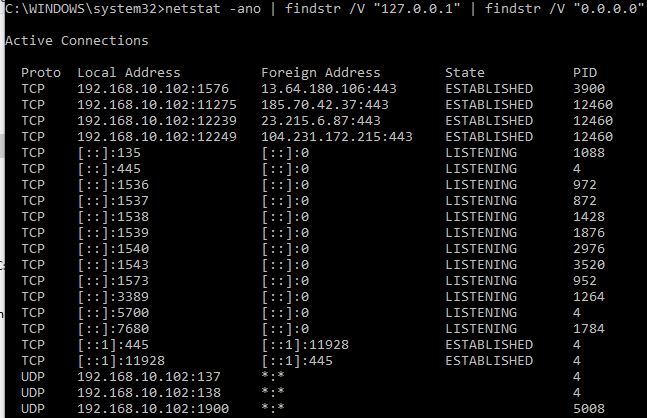
    You can pipe to exclude results by using the /V switch.

    Using TCPView

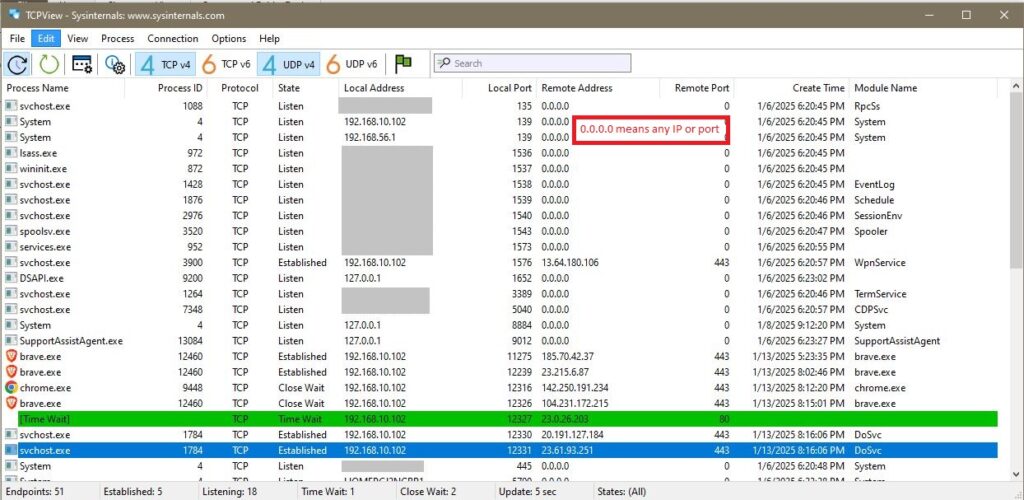
    Think of TCPView (or the older CURRPorts) as a netstat GUI interface. TCPView is produced by Microsoft System Internals and is actively supported. It is easier to read then the command line, auto refreshed every 2 seconds, and provides both fast results as well as the process name.

    You can quickly track down what service is attempting to make an external connection, what remote IP or URL it is communicating with, and over what port. The results can be combined with some google searches to get a complete picture. I find it easier than trying to interpret the netstat command line results.

    The color scheme is tricky. Red means a connection is about to close, green means a connection was just opened, and yellow means a connection has just refreshed. Notice the green bar in the picture below.

  • TCP/IP Stack Using the OSI Model

    TCP/IP Stack Using the OSI Model

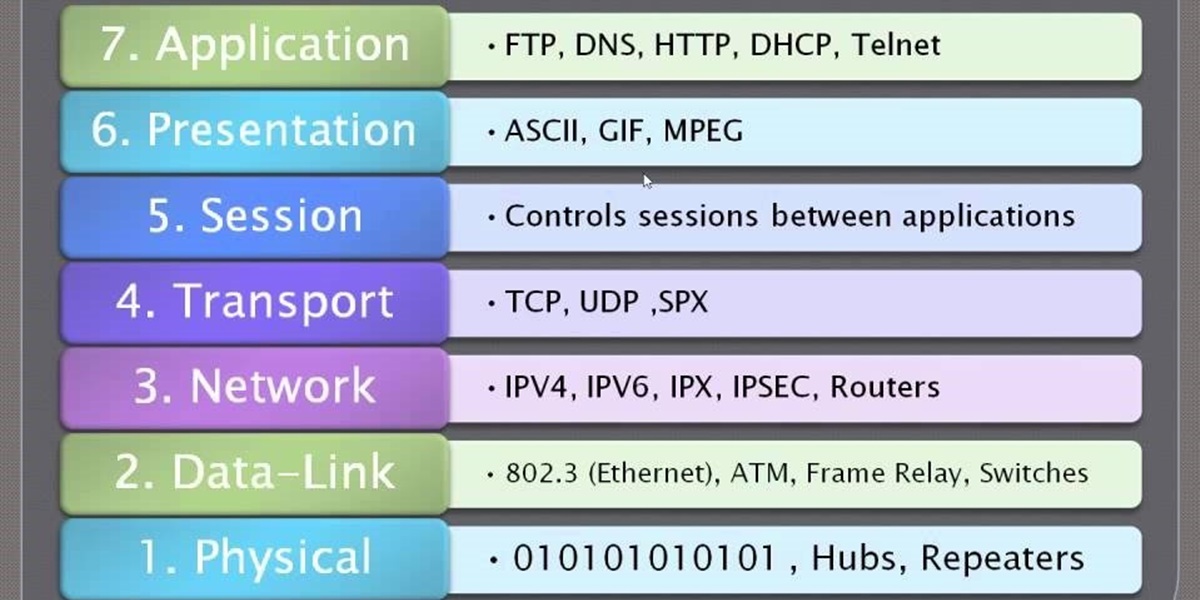
    The OSI model of the TCP/IP stack has become the standard model for understanding how a packet flows into or out of a system. Here is my understanding.

    7. Application Layer – User can interact. (GUI).

    6. Presentation Layer – Encryption (SSL, SSH, IMAP, etc).

    5. Sessions Layer – Manages sessions – (API’s, sockets).

    4. Transport Layer – Assemble bits into packets. End to end. (TCP, UDP).

    3. Network Layer – Transfers the data packets. (IP, ICMP).

    2. Data Link Layer – Addressing & Physical Transmission. (Ethernet, switch, Bridge).

    1. Physical Layer – Wires, hubs.

  • Private IP Address Ranges

    Private IP Address Ranges

    Introduction

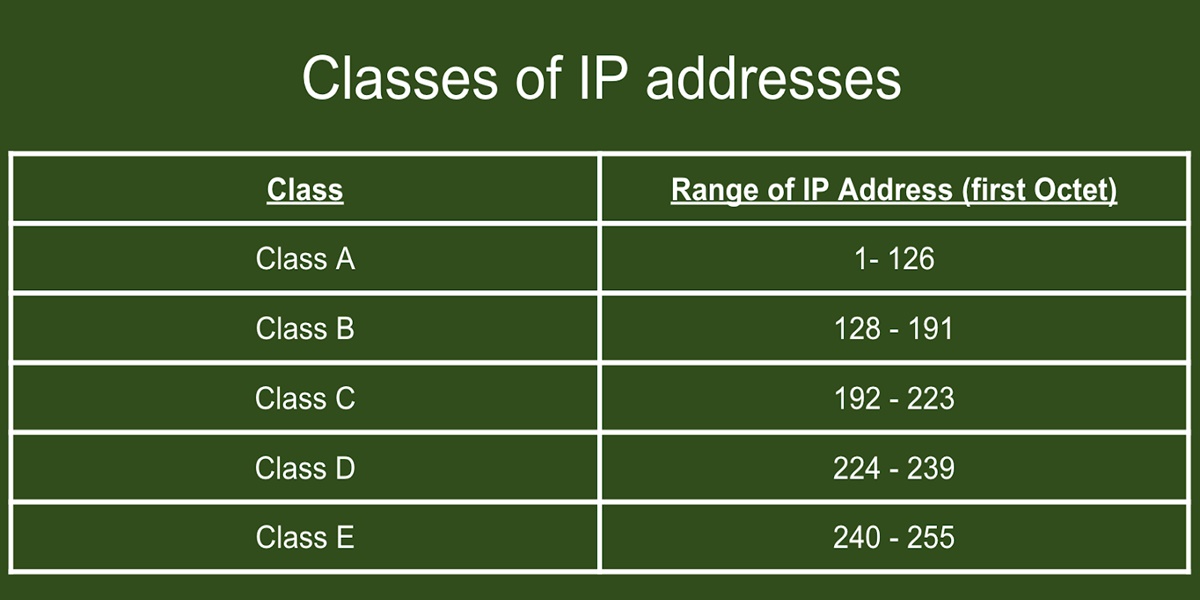
    Private IP address ranges , sometimes called reserve ranges, are for internal devices only. This is the list along with a few other special ranges that are common and should be known.

    Class A

    10.0.0.0 – 10.255.255.255.255
    8 network bits and 24 hots bits
    subnet mask = 255.0.0.0

    Class B

    172.16.0.0 – 172.31.255.255
    16 network bits and 16 host bits
    subnet mask = 255.255.0.0

    Class C

    192.168.0.0 – 192.168.255.255
    24 network bits and 8 host bits
    subnet mask = 255.255.255.0

    Class D (Multicasting)

    224.0.0.0 – 239.255.255.255 (Reserved for TV networks)

    LoopBack

    127.0.0.1 – 127.255.255.255
    Used for network testing. Specifically, it tests a computer’s TCP/IP network software driver to ensure it is working properly.

    APIPA (Automatic IP Addressing)

    169.254.0.1 – 169.254.255.25

  • Updating the Linux OS & Installed Software

    Updating the Linux OS & Installed Software

    Introduction

    The apt (aptitude) command is just a a shortened version of the apt-get command. They are synonymous terms. Use the ‘apt’ command to update and manage your installed software packages. Use with Ubuntu or Debian Linux servers.

    Update and upgrade your system

    # apt update (date your local repository list)
    # apt upgrade (update all installed packages)
    # apt autoremove (remove packages that were installed as dependencies)
    # apt autoclean (clean the /var/cache/apt/archive folder).

    List all installed packages

    apt list --installed

    Get a list of all packages that can be upgraded

    Remove packages with out uninstalling config files

    Remove packages including config Files

    Repository location

    sudo ls /etc/apt/sources.list.d

    References

    https://askubuntu.com/questions/668582/false-disk-full-error-apt-get-unable-to-install-or-remove

  • Regulatory, Compliance, & Security Frameworks

    Regulatory, Compliance, & Security Frameworks

    Introduction

    In the modern information age, there are numerous laws which affect the collection and storage of digital data. These laws often reference security standards that define specific methods of collection, the manner of storage, and other requirements that companies must follow. These regulations and laws are typically industry specific.

    The primary purpose of these laws is to create a base line of rules for companies that collect data on consumers. They outline security protocols that must be followed to keep data safe. For example, a customer’s username and password must be encrypted.

    These rules are collectively known as security frameworks, security standards, regulatory & compliance requirements, among other names.

    Common governing laws

    • GLBA (Gramm, Leach, Bliley Act) – Financial data.
    • CFPB (Consumer Protection Financial Bureau) – Financial data.
    • HIPAA (Health Insurance Portability Accountability Act) – Medical data.
    • GDPR (General Data Protection Regulation) – European consumers.
    • PCI DSS (Payment Card Industry Data Security Standards) – Financial data.
    • ISO 27001 – Information Security Management Systems. – Federal data.
    • FIPS (Federal Information Processing Standard) – Cryptography guidelines.
    • FERPA (Family Educational Rights and Privacy Act) – Educational records.

    Top cyber security frameworks (standards)

    • NIST Cyber Security Framework (NIST CSF 2.0) – Most common.
    • CIS Center Internet Security (Critical Security Controls).
    • PCI-DSS – Payment Card Industry Data Security Standards.
    • SOC2 – Systems and Organizational Controls. (Cert Pub Accountants).
    • ISO 27001 – Information Security. Generally for Fed Agencies.

    Best security practices (basic outline)

    Each framework will provide exact details, but there is a lot of overlap. Here is a general list of what to expect.

    • Governance & Risk
      • Maintain a risk assessment list. Update annually.
      • Establish a cyber security governance framework (NIST CSF 2.0 or CIS).
      • Ensure policies are written and enforced.
      • Establish supply chain risk management program.
    • Identify & Access
      • Implement MFA, 12 character & password rotation.
      • Delete unused accounts.
      • Just in time access for elevated roles.
      • Written job descriptions & RBAC permissions.
      • Limit number of global administrators, no local administrators.
    • Network & Infrastructure
      • Subnet the environment properly.
      • Conduct an annual firewall review.
      • Enforce internet filtering for end users (DNS filtering).
      • Create a golden image for new hosts.
      • Asset management (maintain a list of assets). Include cloud assets.
    • Endpoint & Data Security
      • Create an approved software list.
      • Patch and vulnerability program.
      • Endpoint Protection (virus software, XDR/EDR).
      • Data Protection & Encryption (enforce at rest and in transit).
      • Application security (scan your code, pen testing).
    • Continuous Monitoring & Response
      • Centralized logging & SIEM.
      • Integrate threat intel feeds & monitoring for zero day.
      • Make an incident response plan. Test with table top exercise.
      • Employee Training – phishing simulation.
    • Business Continuity & Compliance
      • Backups & Disaster Recovery Plan
      • Application security testing.
      • Compliance mapping. Ensure controls meet SOC2, PCI, HIPPA, etc.
      • Executive reporting & metrics. (risk dashboard, audit results, etc.)