Category: Tech

  • Start Encrypting Your Files in Windows

    Start Encrypting Your Files in Windows

    Getting Started

    File encryption adds a level of security to your critical files. In Windows, you can create an encrypted folder and it will auto encrypt any files you drop into the folder.

    Windows uses the Encrypted File System (EFS) platform. The first time you encrypt a file, it will auto generates a key set and a certificate. Windows manages the encryption for you on the backend. In other words, once you set it all up, it will automatically decrypt a file when you open it, and encrypt it when you close the file.

    After you set up a folder in windows and encrypt it, any files you drop into that folder will automatically be encrypted too. No need to set the encryption on each file.

    Check to see if your files are already encrypted.

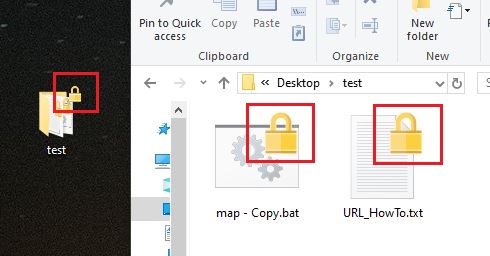
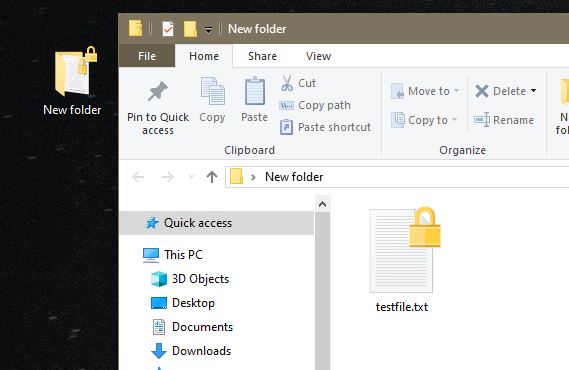
    Does the folder or file has a lock on it?

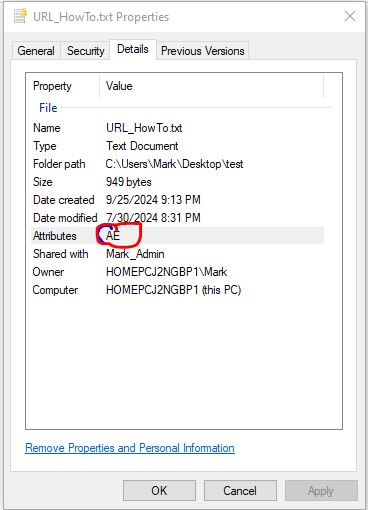
    An alternate method, is to go to the file, right click, select details, check the attributes for the E flag. (Note: The A flag means the archive bit is set).

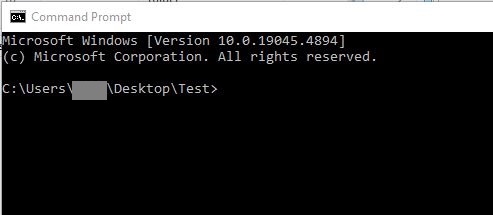
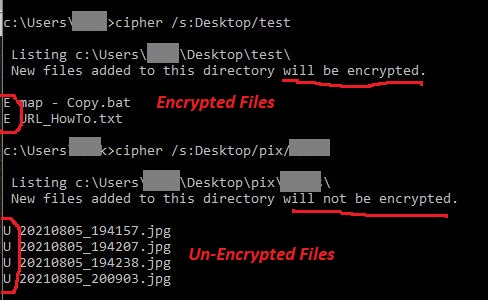
    Finally, you can open a command prompt and run cipher.

    Here are two folders, one has encrypted files inside it and one does not.

    Encrypt a folder or files

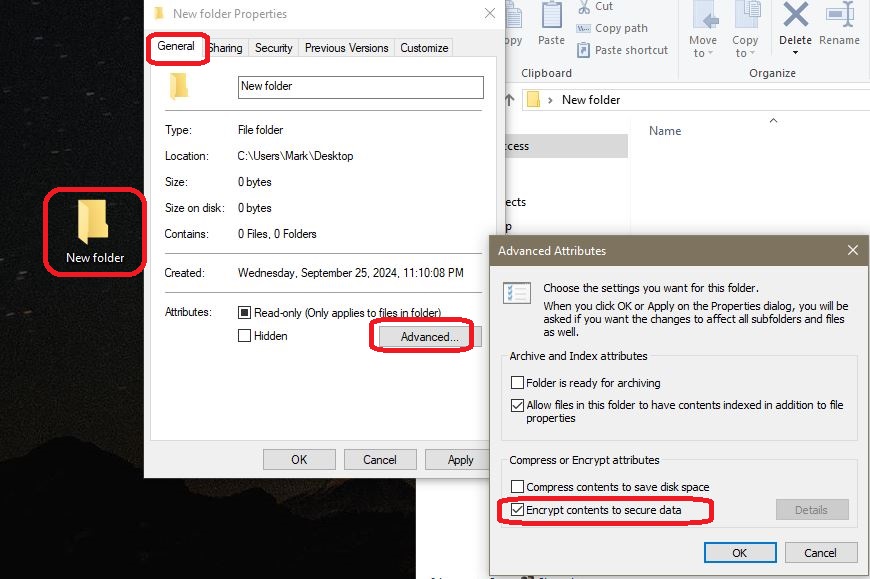
    The easiest way to encrypt multiple files is to create an encrypted folder and drop files into it. Make a new folder on the desktop, right click on folder, select properties, go to general tab, select advanced button, and check the encrypt box.

    After you see the lock icon on the folder, this means the folder is encrypted. Any files you drop into it, will automatically be encrypted too and will display the lock icon. If you drag the the file outside the folder, it will remain encrypted.

    Note: the lock symbol does not always show up right away after you encrypt a file/folder, don’t panic.

  • Understanding User Crontabs

    Understanding User Crontabs

    Introduction

    Crontab stand for CRON table and it is the primary task scheduler for Linux. The CRON daemon runs every minute and checks each user’s crontab (and the system crontab) for scheduled jobs. CRON will auto start on reboot and record to syslog natively when a job runs. CRON will send “standard out” and “errors” to the scheduled user’s mail account at /var/spool/mail/user. By default, CRON uses the bash shell to execute commands.

    There are two types of crontabs; user crontabs and system crontabs. The system wide CRONTAB jobs are stored in /etc/crontab. It is used to execute scripts that apply to the system change or all users. It requires an additional field in the crontab called a user field. This article will be focused on setting up a user’s crontab.

    If your script runs successfully from the command line, but not when it is run as a CRONTAB job, it is because crontabs are executed by the user CRON. That user has limited rights and does not have the same environmental variables as a regular user. It is recommended to always use absolute paths for shell, commands, and scripts, in your crontab.

    Understanding crontab

    Key Terms:

    • Min = 0 to 59
    • Hour = 0 to 23 (Hours are in Military time)
    • Day of Month = 1 to 31
    • Month = 1 to 12 or Jan, Feb, Mar
    • Day of Week = 0 to 6 (0 is Sunday) or mon, tue, wed
    • @reboot = run once after reboot

    Pattern Matching:

    • * = match everything
    • Range = 0-4 or jan-jun
    • List = 1,3,7,16 or mon,tue,wed
    • Step Values = 0-23/2 = run the job every two hours for 24 hours.

    File Locations:

    • System file =/etc/crontab
    • System jobs = /etc/cron.d/ (Location to store system scripts)
    • System jobs = /etc/cron.daily (Location to store system scripts)
    • System jobs = /etc/cron.weekly (Location to store system scripts)
    • System jobs = /etc/cron.hourly (Location to store system scripts)
    • User’s crontab (debian) = /var/spool/cron/crontabs/<user>. (DO NOT EDIT DIRECTLY)

    Troubleshooting:

    • Crontab Logs = /var/log/syslog (logs, i.e. did command run??)
    • Crontab Job Results (debian) = /var/spool/mail/<user> (output and errors)
    • Verify cron is running = sudo systemctl status cron (Is cron running ??)

    List the current user’s crontab

    Edit current user’s crontab

    NOTE: Some documents say, after you save and install a new CRONTAB, you need to reload the CRON service by running “service cron reload”. But, other documents say you do not to perform this action.

    Remove current user’s crontab

    List another user’s crontab

    Run a job at a specified time

    NOTE: CRON uses military time, which is using hours 0 to 23.

    Potential syntax errors

    Be careful when writing cron jobs. For the day of week and day of month fields, crontab should be interpreted as AND statements. The command will run when either field matches the current time! This example would not run a script on the first Monday of the month. Rather, this job runs on the first day of the month and every Monday.

    Skip values can only operate within the time period they´re attached to. The above will not execute every 35 minutes. Rather, it will execute at 0 minutes and 35 minutes each hour.

    Start a program on server reboot

    “/usr/bin/perl -w” mean to enable and print warning messages.

    Run a script and email the results

    Send stdout&err to syslog w tag “ossec”

    Redirect screen & error output

    Screen output and errors are recorded in the user’s mailbox at /var/spool/mail/<user>. When scripts run overnight, output to the screen (stdout) is not needed. It is common to send standard out to /dev/null and errors to a custom log file. You will need to ensure that the log file does not grow out of control.

    2>&1 means to send any errors to the same location as standard out. Order matters! you can not send errors to location that does not exist. Be sure to identify the location of the screen output first.

    References

    https://krisjordan.com/blog/2013/11/04/timesaving-crontab-tips

    https://www.generateit.net/cron-job/

  • Top Windows Terminal Commands

    Top Windows Terminal Commands

    Introduction

    Although PowerShell has made progress over the last few years as the preferred command line tool, I find that knowledge of the original command line is still very valuable. You can use the command line to quickly get system information or write batch scripts to automate simple tasks.

    Most commands can be run as a regular user. But, as always, depending on what you are doing some commands may need to be run at an elevated prompt. To see all available commands, type “help”. To see help about a specific command use “<command> /?”.

    Navigate & Help

    cd /d H:Change drive to H: drive
    cd \Change directory to C:\
    helpSee all commands.
    <command> /?Get help about command <command>.

    User Information

    net user administrator /active:yesEnable the hidden Administrator acct (run cmd as admin).
    gpupdate /forceUpdate the user’s group policies.
    net user username1 /domainGet current user details (last logon, passwd age, etc).
    gpresult /user <user1> /r | moreGet a list of the user’s domain groups.
    psloggedon \pcname or ipSee who is logged in (sys internals).
    net usersprint a list of all system users.
    sc query | moreDisplay status of active services.
    net localgroup administratorsList all local administrators.
    net localgroup “remote desktop users”List users allowed to login remotely.

    Folder & Files

    dirDisplay files in the current folder.
    cipher s:/<Folder name> Check if a folder/file is encrypted.
    cipher /cDisplay info on the encrypted file.
    mkdirMake a Directory
    find or findstr “Find”Find all lines with the word “joe”.
    del newfile.txtDelete the file newfile.txt.
    move [source] [ target]Move file to new location.
    fc /a monthly.txt sales.txtCompare two text files.
    robocopy /s [src] [dst]Copy directories except empty ones.

    System Information

    msinfo32Launch the system info GUI.
    hostnameDisplay the name of the computer.
    wmic cpu get numberofcores, NumberOfLogicalProcessorsDisplay # of CPU cores and logical processors.
    wmic /node:10.10.56.10 bios get name, versionDisplay BIOS name & ver. from a remote PC.
    wmic os get caption, versionDisplay OS name and version.
    wmic computersystem get manufacturer, modelDisplay PC manufacturer and model.
    systeminfo <hostname> | find “OS Name”Display the OS Name only.
    net shareList all files on the system that you are sharing.

    System Tasks

    msconfigLaunch sys config GUI. Manage startup programs.
    taskkillKill running processes.
    shutdown /rShutdown and reboot the pc.
    mstsc /adminStart an RDP session.
    tasklistdisplay running processes.
    wmic process get description, executablepathdisplay running executables.
    schtasks /query | moreDisplay scheduled tasks

    Networking

    ping -aTest network connectivity and resolve DNS.
    ipconfig /allDisplays current IPv4, DNS server name, and Gateway router IP, and other info.
    nslookupReturns an IP address or a name.
    tracert <url>Trace & displays path to reach an internet host.
    netstat Check the UDP/TCP connections. ( See Article)
    route printList routing table.
    arp -aGet address resolution table.
    netshChange network setting, like whether to use DCHP (See below).
    nbstat Display stats and current connections using NetBIOS over TCP/IP.

    How to Manually Set Your Networking

    Run these commands at an elevated prompt.

    Set a static IP

    Set DHCP from a static IP address

    Set A Primary DNS Server To a static IP

    Set the secondary DNS server to a static IP

    Set your DNS settings to be assigned dynamically

    netsh interface ip set dnsservers name="Local Area Connection" source=dhcp

  • Ansible Ad-Hoc Commands

    Ansible Ad-Hoc Commands

    Introduction

    Ansible gives you a powerful option to run commands ad-hoc. This negates the need to write a script, if you only need some quick information. There are two separate options for gathering data via ad-hoc. If you are running just a single command than use the ‘command’ module. If you need to run multiple commands, use the ‘shell’ module.

    You may or may not need to reference the your inventory file, if you are using DNS names. If you are using IP addresses, then you probably do not need it.

    -m = module (shell or command)
    -a = argument (command you want to run on the remote system).

    Run a Single Command against Multiple Hosts

    ansible -i inventory.ini -m command -a 'ip a' server1,server2

    Run Multiple Commands against a Single Machine

  • Tips to Safeguard Your Digital Secrets

    Tips to Safeguard Your Digital Secrets

    Introduction

    Password manager databases, asynchronous keys, digital signatures, and MFA recovery passcodes are designed to identify you, decrypt files, or help you recover from a failed 2FA login. Care must be taken to protect these digital items so they do not fall into unwanted hands.

    The below techniques are not a cure all, and other options should be considered. But, these are basic beginning steps that can be taken to help keep your data private.

    What ever options you choose, always make sure to BACKUP your data on a flash drive and store it in a “real world” safe. If keys, digital signatures, databases are lost or corrupted, there is no method to recover them.

    Method 1 – Hide the Folder

    Place your password database or asynchronous keys in a hidden folder. In Linux, to make a hidden folder, use a dot in front of the directory name like”.ssh”. To make a folder hidden in Windows, right click the folder, select properties, to go the general tab and select “hidden”. Although this method does not provide much protection by itself, it is a good starting point.

    Method 2 – Set File Permissions

    Change permissions on the files or folder so that only your account can access it. Use an explicate deny to all users including the system and administrator accounts. In Linux, this means changing a file’s rwx permissions to something like 400. In Windows, files are inherited by the parent folder. Right click on file, select properties, select, security tab. Under the “Group or username” section, select the edit button. Highlight each account, except your account, and select “Remove”.

    Method 3 – Print a Hard Copy

    After initially setting up an account on an application or website, you may given recovery or one-time authentication passcodes. This is an backup procedure to grant you access to the application in the event of an emergency that your regular MFA fail to work. Rather than printing these codes to PDF and keeping them on your PC. Print the passcodes to paper and store them off the network in a physical “real world” safe.

    Method 4 – Add a Passphrase

    In asymmetric cryptography, you have a public key and a private key. The private key is to remain confidential. To help protect your private key, you can add a passphrase to it. A passphrase is a password for your private key. When used in conjunction with other security features, it may help slow down attackers. They will have to crack, yet another password, before they can access the key.

    Method 5 – Encrypt Files

    Store important files in an encrypted folder. In Windows, any file dropped into an encrypted folder will automatically be encrypted too. Simply right click on a folder, select properties, go to general tab, select advanced attributes, and select “Encrypt contents to secure data”. The Microsoft OS will automatically take care of encrypting and decrypting the folder and contents when it is accessed locally.

    Ensure that your password manager database is encrypted. If you are using KeePass it is automatically encrypted when the database is generated.

    Method 6 – Flash Drive (preferred method)

    Store the private key or database on a portable flash drive or YubiKey and only plug it in to your computer when you need to access it. For added safety, encrypt the flash drive.

  • Managing Your Passwords

    Managing Your Passwords

    Forward

    Good password habits are essential for any person who works regularly online. Due to regulations or contracts with customers, many business are required to have specific password polices. In 2024, here are some of the most recent recommendations concerning passwords.

    Password Best Practices

    As part of a good password management practice, whether at home or work, you should incorporate some or all of the below ideas.

    • Do not reuse old passwords. Maintain a password history.
    • Always use 2FA, where possible.
    • Require long complex passwords. (12+ characters)
    • Change your password, whenever you are involved in a data breach.
    • Use a unique password for each separate application.
    • Store passwords in an encrypted format.
    • Use a password manager.
    • Change your passwords on a regular basis.
    • Use public/private passkeys, instead of passwords, where possible.

    Use a Password Manager

    Rather than using the same password to login to everything, it is recommended to use a desktop password manager. Avoid browser based password managers. An application like KeePass, allows you to set unique strong passwords for each website or application.

    • Use 2FA to login to the password manager.
    • Authorize specific users to only access specific vaults.
    • Identify risky users and risky accounts in advance.
    • Disable browser based password managers.
    • Set to automatically generated strong passwords.
    • Train all employees / users on how to use the password manager.
    • Consider enabling PAM, if appropriate.

    Reference: https://keepass.info

    Conduct Regular Password Audits

    Just as important, as creating and maintaining passwords, is conducting a routine audit on your password database. A routine audit could catch unwanted activity early and prevent undesired access being granted. Things to look for, would be:

    • Who has been accessing the passwords?
    • Was there after hours access?
    • Was there multiple sequential failed attempts in a short time frame?
    • Did a user accessed all passwords in a short time frame?
    • How frequently has a single key been accessed?
    • Identify at-risk users who are accessing the database (been a victim of a breach lately?)
    • Review logs for restricted functions (create, delete, copy, or modify passwords).