Tag: linux

  • Using SSH Keys

    Introduction

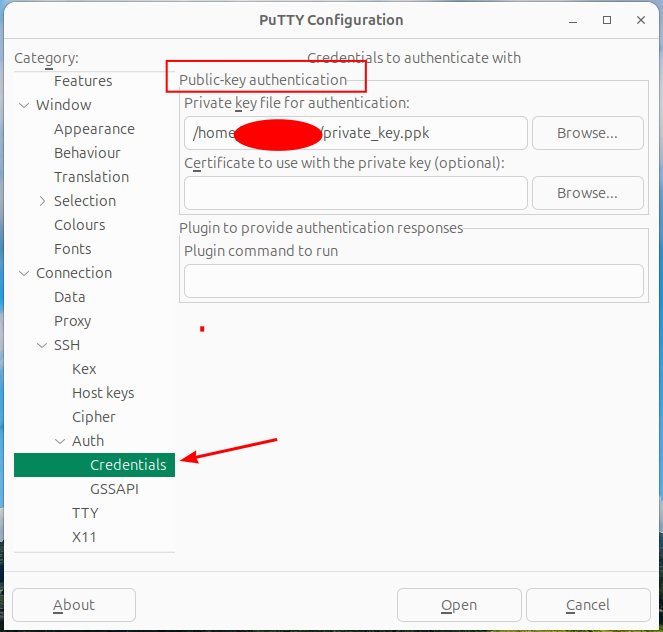
    Most folks are familiar with logging into a device or a a web page using a username and password. But a more secure method is to use a public private key exchange.

    Ubuntu comes preinstalled with all the tools necessary to create public private keys. The private key is kept hidden and secure. The public key will be give out freely. It is recommend that you rotate your key pair frequently as a safety precaution.

    In this article, we will look you how to generate a key pair, save your private key to a secure location, copy your public key to a remote host, troubleshoot, and introduce an auto login auto method.

    Create a key pair

    In order to make this work, you must have a user account already on the remote server.

    Login to the Linux computer that will be the device that you will connect from. This computer is the main control computer and where you will save your private key.

    Open a command line prompt and run …

    ssh-keygen -t rsa

    After the keys are generated, they will be stored under:

    • /home/username/.ssh/id_rsa (private key).
    • /home/username/.ssh/id_rsa.pub (public key).

    Store the fingerprints of the remote PC

    Before we can use the keys, we need to first store the remote server’s finger prints. We do this by ssh to the remote server three times.

    • Server’s host-name (i.e. server1).
    • Server’s FQDN (server1.mycomapny.com).
    • Server’s IP address (192.168.20.100).

    Each time you ssh, you will be cautioned that the server is unknown and do you want to store the fingerprint. Select yes.

    The fingerprints will then be stored in a file located under the specific user at /home/username/.ssh/known_hosts.

    Push the public key to the remote host

    This will create the ~/.ssh/authorized_keys directories, if they do not exist and place the public key inside the file.

    Add a passphrase to your private key

    If you add a passphrase to your key, if the key gets compromised, bad actors will need to crack the passphrase first before they can use the key. This may give you a little extra time. You can use this time to generate new keys. It is best practice to add a passphrase.

    To clear a passphrase, just hit enter, when it prompts you too add a phrase.

    Automatically present your private key

    If you add a passphrase to a key you will be prompted to enter it each time you logon to a remote server. If you have multiple servers to login to, it can become a burden.

    The solution is to temporary store your passphrase. It will only be kept as log as the current session is running. If you logout of you session the temp file is auto removed.

    It will be auto presented on login by running two small built in programs by using these commands.

    Use a key other than the default

    You can specify the file path to a specific key or if it is not stored in the default location by using the -i switch.

    -i = identity file (aka. private key)

    Troubleshoot File Permissions

    1. Verify .ssh and authorized keys belong to the correct user. chown -R user:user ~/.ssh
    2. Check permissions of files.
      • Authorized_keys = 644 = loaded on the remote servers you are connecting to
      • .ssh = 700
      • public key = 644
      • private key = 600
      • known_hosts = 644
      • home directory = /home/user = chmod go-w /home/user
    3. restart ssh after permissions update = $ service ssh restart

    Remove a host from authorized_host file

    If you replace a remote host that you connect to and reuse the IP address or the host name. they next time you connect you may get an error. This is because the remote host fingerprint has changed. The older fingerprint needs to be removed and and new fingerprint needs to be installed (see above).

    Reference

    https://www.digitalocean.com/community/tutorials/ssh-essentials-working-with-ssh-servers-clients-and-keys

  • Add a Personal Package Archive to Ubuntu

    Add a Personal Package Archive to Ubuntu

    Introduction

    PPA stands for Personal Package Archive. The primary purpose of a PPA is to provide a way for developers to distribute their own software. PPA are stored on Launchpad.net, which is the official website for PPA’s and is managed by Canonical. PPA’s can be created by anyone and you should only install a PPA from a trusted developer. Use at your own risk.

    A secondary purpose of PPA’s is for updating well known software. When Ubuntu reaches out to the official archive repository to get updates, these packages are often outdated and do not contain the latest available software. To get the most recent version, you can set up and install an appropriate PPA. Then, when you run the update command, your host will reach out to both the official archive and the PPA. Whom ever has the most recent software available, will get download and installed on your host.

    Typically, each PPA has a GPG key that needs to be installed. Each time an update is run, the keys are exchanged, to verify that you have connected to the correct repository, prior to any downloads. The key should be automatically installed with the initial PPA installation setup.

    After a PPA is initially setup. It should survive any system reboots. If you need to disable the PPA for any reason, you can open the PPA file under /etc/apt/sources.list.d/ and comment out the line calling the PPA. Then run an ‘apt update’ again, before running ‘apt upgrade’.

    Example PPA Install & Setup

    We will be using the popular PPA Apache2 for installation. This is a well known PPA and is maintained by ondrej, a Debian developer. So, it should be safe.

    1. apache2 -v (Note the current installed version).
    2. sudo apt -y install software-properties-common (to install a PPA, the add-apt-repository command is needed).
    3. sudo ls /etc/apt/trusted.gpg.d/ (Check the key was installed).
    4. sudo add-apt-repository ppa:ondrej/apache2 (The GPG keys are also installed w this command).
    5. sudo ls /etc/apt/sources.list.d/ (verify the package was installed).
    6. sudo apt update
    7. sudo apt install apache2
    8. apache2 -v (verify that the new version is installed).
    9. service apache2 restart (restart the service).

    References

    https://launchpad.net/~ondrej/+archive/ubuntu/apache2

    https://www.digitalocean.com/community/tutorials/how-to-handle-apt-key-and-add-apt-repository-deprecation-using-gpg-to-add-external-repositories-on-ubuntu-22-04

  • Backup to a Remote Server using Bash

    Backup to a Remote Server using Bash

    Introduction

    A great way to backup your Linux files is through automation. Linux contains many built in commands that can be used to automate this process. In this article, we will write a simple bash script to backup critical files to a remote host.

    For this to work, a user account is needed on both hosts to transfer the files. The sending server will need the private SSH key and the receiving server will need the public SSH key. These keys are used to automatically authenticate to the remote server. Creating and deploying a SSH key pair for authentication is beyond the scope of this article.

    The script will use the scp command as it uses SSH underneath the hood. This means it will natively automatically check for an identity file stored under the user’s account at ~/.ssh/config. When creating the SSH credentials, do not add a passphrase to the private key.

    Secure copy (scp) command is good if you just want to copy a single file. You can use the -R switch to copy all files in a directory. If you need to backup multiple files, you can modify the script and just add additional variables, update checks, and then add more scp commands.

    If you need to transfer entire directories consider using the rsync command. Rsync like scp should automatically use the ~/.ssh/conf file by default. However, rsync sometime has issues using an identity file, so do proper testing.

    Finally, Consider setting up a CRON job to run the script nightly.

    Procedure

    Lets build a script on server1 and we will be connecting and coping our file to server2. First, set up the head of the script and call bash and add any comments.

    Next, let’s set up the script variables.

    Next, lets run a check on the remote server and test if the file path exists!

    Finally, copy the file to the remote server.

    Lastly

    Create a cronjob to run nightly at 9:00 PM.

    References

    https://unix.stackexchange.com/questions/127352/specify-identity-file-id-rsa-with-rsync

  • Manage Users & Groups

    Manage Users & Groups

    Introduction

    Managing user and groups in Linux is an essential administrative task. We will cover the manual method to create a new user and add that user to a group. Also, remove that user in a multi step process. Finally, we will cover selective tasks concerning Groups.

    There is a separate article concerning adding the same user to multiple servers using Ansible. We will not duplicate that information here.

    Create a User Account

    First, get a list of all users on the host.

    Now, create a new user called mark.

    Remove a User Account

    If we want to fully remove a user we will need to follow several steps.  Also, the user’s files on other remote systems will need to be manually searched for and removed or have the ownership changed.

    You can not remove an account if the user is currently logged in. This is because the user will have existing running processes.

    Lock the user’s account, so they can not login.

    Backup the user’s account data.

    See if the user has any running processes and kill them.

    Remove the user’s crontab jobs.

    If necessary, cancel any running print jobs. (Linux print remove).

    Assign Mark’s files to another user named Tom.

    -exec = execute script.
    chown tom:tom = Change ownership to tom.
    {} = for each file that is found
    \ = Terminate script when done.

    Since we will be deleting the home and mail spool directories, and we have already made a backup, we do not need or want to search those directories by changing the file permissions right now. This will prevent us from deleting them and lead to orphan files. So we will modify the above command to exclude those. We only want to change ownership for files outside of those two directories.

    -p = path to exclude
    -prune = Do not search specified path.
    -o = OR

    Finally, remove the user’s account. Some users like to use the deluser command and some like to use the older userdel command. They do essentially the same thing. I am using deluser, as it is a higher level command and also deletes the user’s /home directory and mail spool.

    –remove-home = removes /home and /var/spool/mail.
    –remove-all-files = removes /home,/var/spool/mail, and attempts removal of all other files.

    Lastly, check to verify there are no remaining files assigned to the user.

    Create a Group

    Lets create a group called analyst.

    Add a User to a Group

    Let’s add the new user mark to the analyst group. NOTE: You must be a member of a group before you can add others to the same group.

    -a = Append
    -G = Group

    NOTE: For centOS systems, need to run the command ‘$ usermod -aG wheel <user>’

    Review Group Memberships

    Lets see who is in the group analyst and see what groups the user ‘mark’ is in.

    Remove a User from Group

    We can remove the user mark from the analyst group. The command is not as clean as adding a user. It is not obvious that these are group commands. You can use either of the two below commands.

    -d = delete user from group.

    Change a File’s Group Permissions

    Next, lets change ownership of a file to the group ‘analyst’. Although there are other methods, I prefer the one shown below, as it is more granular. After you change a file’s group permissions, users will not be able to access the file until they log off and back on again.

    References

    https://linuxize.com/post/how-to-add-and-delete-users-on-ubuntu-18-04/

    https://www.digitalocean.com/community/tutorials/how-to-add-and-delete-users-on-an-ubuntu-14-04-vps

  • Updating the Linux OS & Installed Software

    Updating the Linux OS & Installed Software

    Introduction

    The apt (aptitude) command is just a a shortened version of the apt-get command. They are synonymous terms. Use the ‘apt’ command to update and manage your installed software packages. Use with Ubuntu or Debian Linux servers.

    Update and upgrade your system

    # apt update (date your local repository list)
    # apt upgrade (update all installed packages)
    # apt autoremove (remove packages that were installed as dependencies)
    # apt autoclean (clean the /var/cache/apt/archive folder).

    List all installed packages

    apt list --installed

    Get a list of all packages that can be upgraded

    Remove packages with out uninstalling config files

    Remove packages including config Files

    Repository location

    sudo ls /etc/apt/sources.list.d

    References

    https://askubuntu.com/questions/668582/false-disk-full-error-apt-get-unable-to-install-or-remove

  • Copy Files to S3 Using AWS CLI Tools

    Copy Files to S3 Using AWS CLI Tools

    Introduction to the AWS CLI

    There are three methods to upload and download data to Amazon Web Services. You can use the command line (CLI), AWS SDK, or the S3 REST API. In this article, we will explore the command Line interface, and the most common commands to manage an S3 bucket.

    The maximum size of a file that you can upload by using the Amazon S3 console is 160 GB. The maximum bucket size is 5TB. You can not use s3api on files uploads larger than 5GB. Command line tools can achieve upload speeds greater than 7 MB’s. But, you can go even faster if you turn on acceleration. It is not recommended because an additional cost will be incurred.

    Common switches

    • –dryrun = test what files would be uploaded, prior to running command.
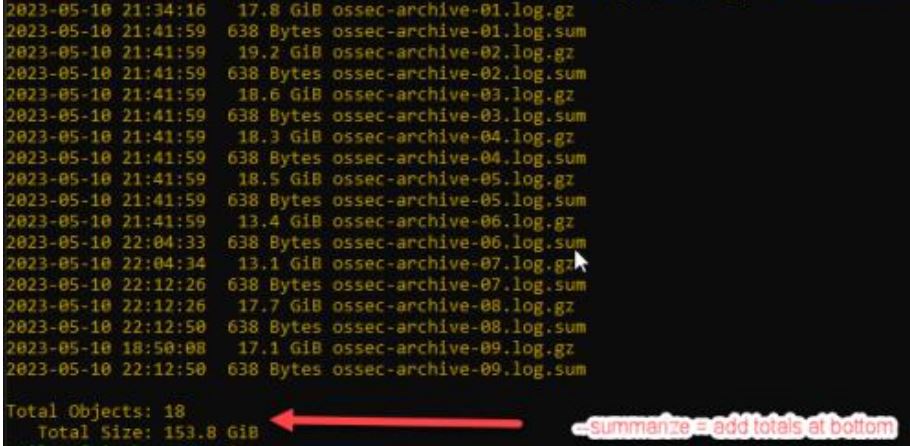
    • — summarize = include a total at the bottom of the output.
    • — human-readable = show files sizes in Gb and not Bytes.
    • –output text = format the output on separate lines
    • –content-type=text/plain = Tell aws the upload data is text data (not video or other).
    • –recursive = show full file path
    • –exclude – leave out certain files.
    • –include = include certain files.
    • –delete = this flag is needed to remove any files.
    • –meta-data = Use this flag to upload custom data like the true MD5 hash

    List contents of a bucket

    Copy a single file

    If the file is large, the cp command will automatically handle a multi-part upload dynamically. If the full path is not present, it will create it automatically in the s3 bucket.

    Copy multiple files from a local directory

    There are two commands that can be used to copy multiple files. Use sync or cp with the –recursive switch.

    OR

    Copy only files with .sum extension

    Copy a directory and exclude two files